How to Get a YouTube Channel: Complete Setup Guide for New Creators
You want to start making videos. You have ideas, maybe some equipment, and the motivation to hit publish. But first, you need a channel.
Getting a YouTube channel is free and takes about five minutes. The real work comes after: choosing your niche, setting up branding that looks professional, and uploading your first video in a way that gives it a fighting chance. According to OneStream, YouTube has over 2 billion monthly active users, which means your potential audience is massive. It also means competition is fierce.
This guide walks you through every step, from clicking "Create Channel" to publishing your first video with the right metadata. You will learn what to set up on day one, what mistakes to avoid, and how to position your channel for growth from the start.
Create Your Google Account and YouTube Channel
You need a Google account to create a YouTube channel. If you already use Gmail, you have one. If not, go to accounts.google.com and sign up. Use an email address you check regularly, because YouTube will send notifications about comments, subscribers, and policy updates to this account.
Once you have a Google account, go to youtube.com and sign in. Click your profile icon in the top right corner, then select "Create a channel." YouTube will prompt you to choose between two options: a personal channel or a Brand Account.
A personal channel uses your Google account name. If your name is Sarah Johnson, your channel will be "Sarah Johnson." This works fine for vloggers, educators, or anyone building a personal brand.
A Brand Account lets you choose any name and allows multiple people to manage the channel without sharing login credentials. If you plan to build a business, work with a team, or want a channel name that is not your legal name, pick this option. You can always convert a personal channel to a Brand Account later, but starting with the right structure saves hassle.
After selecting your channel type and confirming your name, your channel exists. It is live. You can upload videos immediately. But before you do, set up the basics so viewers who land on your channel do not see a blank page.
Choose Your Niche Before You Brand
Many creators skip this step and regret it later. They create a channel, upload random videos, and wonder why nothing gains traction. According to 1of10, a clear niche helps attract the right audience, rank in search results, and monetize faster.
Your niche is the specific topic or category your channel focuses on. "Lifestyle" is not a niche. "Budget meal prep for college students" is a niche. "Gaming" is not a niche. "Speedruns of indie platformers" is a niche.
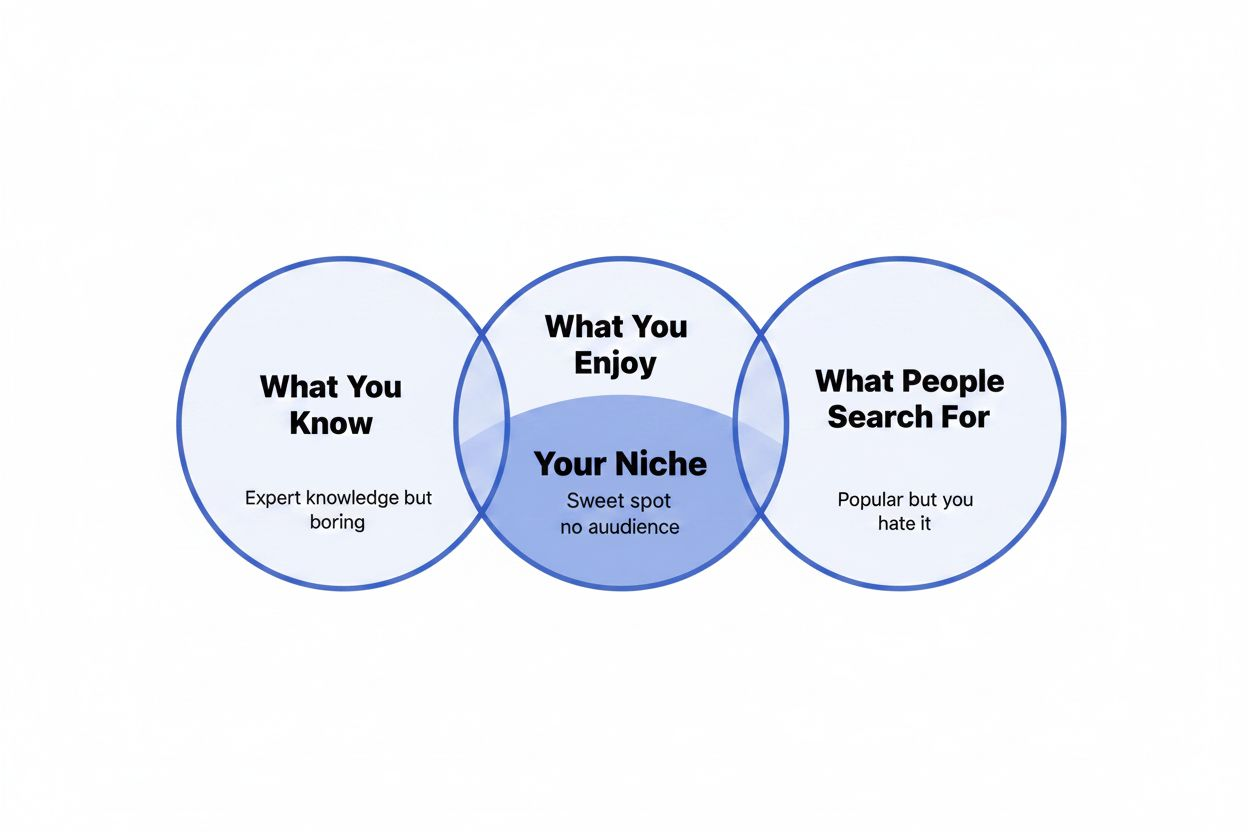
A good niche sits at the intersection of three things: what you know, what you enjoy, and what people search for. If you love cooking but hate talking about it on camera, cooking videos will burn you out. If you are passionate about a topic nobody searches for, you will struggle to get views. If you chase trends you do not care about, your lack of enthusiasm will show.
Start by listing five topics you could talk about for 20 minutes without notes. Then search those topics on YouTube and look at the view counts. Are people watching? Are the top videos from channels with millions of subscribers, or are smaller creators getting traction too? If every top result is from MrBeast or a major media company, the niche might be too competitive for a beginner.
Look for gaps. Maybe everyone covers "how to build muscle" but few explain "how to build muscle with a home gym under $200." Maybe travel vlogs are saturated, but "solo travel tips for people with social anxiety" has room.
Your niche will evolve. You do not need to commit forever. But starting with focus gives you direction and makes every other decision easier.
Set Up Your Profile Picture and Banner
Your profile picture appears next to every comment you leave and in search results. It should be recognizable at tiny sizes. If you are building a personal brand, use a clear headshot with good lighting. If you are creating a business or anonymous channel, use a logo.
According to Medium, your profile picture should be 800 x 800 pixels. Upload a square image and YouTube will crop it into a circle. Make sure important elements are not near the edges, or they will get cut off.
Your banner is the large image at the top of your channel page. According to 1of10, the recommended size is 2560 x 1440 pixels. YouTube displays this image differently on desktop, mobile, and TV, so keep text and important visuals in the center 1546 x 423 pixel "safe area."
Your banner should communicate what your channel is about at a glance. Include your upload schedule if you have one ("New videos every Tuesday"), your niche ("Beginner guitar lessons"), or a tagline that sets expectations. Avoid clutter. A simple design with readable text beats a busy collage.
Free tools like Canva offer YouTube banner templates with the safe area marked. You can create a professional-looking banner in 10 minutes without design experience.
To upload these, go to your channel page, click "Customize channel," then select "Branding." Upload your profile picture and banner here. While you are in this section, upload a video watermark. This is a small logo that appears on all your videos and lets viewers subscribe without leaving the video.
Write a Channel Description That Explains Your Value
Your channel description appears in YouTube search results and on your "About" page. It tells new visitors what you offer and helps YouTube understand your content for recommendations.
Write 100 to 200 words that answer three questions: What topics do you cover? Who is your content for? What makes your approach different?
Bad example: "Welcome to my channel! I make videos about stuff I like. Subscribe for more content!"
Good example: "I teach beginner guitarists how to play their favorite songs without reading music. Every video breaks down a popular song into simple, repeatable steps. If you have been struggling with tabs or theory, this channel is for you. New lessons every Tuesday."
The good example is specific. It names the audience (beginner guitarists), the format (song breakdowns), and the benefit (learn without reading music). It also sets an expectation (weekly uploads).
Include relevant keywords naturally. If your niche is "budget travel in Southeast Asia," use that phrase in your description. According to Medium, you can add niche keywords by navigating to YouTube Studio, then Settings, then Channel, then Advanced Settings. Add keywords that describe your content, separated by commas. These help YouTube categorize your channel.
Add links to your social media, website, or email in the description. If you want sponsorships or collaborations later, include a business email.
Plan Your First Five Videos
Do not upload one video and wait to see what happens. Plan a small batch. This forces you to think about content strategy instead of winging it.
Your first video should answer a question your target audience is searching for. Use YouTube's search bar to find these questions. Type a broad keyword related to your niche and look at the autocomplete suggestions. Those are real searches from real people.
If your niche is "home organization," you might see suggestions like "home organization ideas for small spaces," "home organization hacks," or "home organization for beginners." Each of these is a potential video topic.
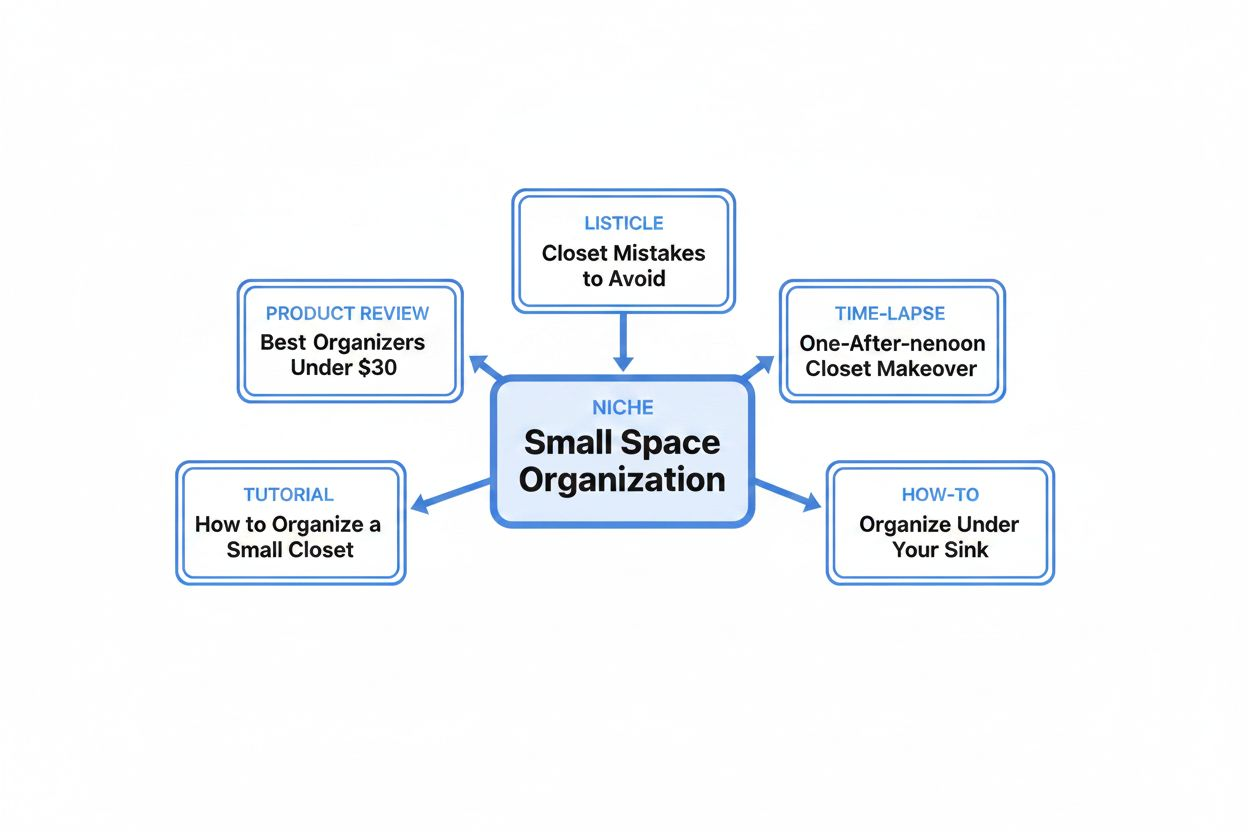
Your second through fifth videos should cover related topics. If your first video is "How to organize a small closet," your next videos might be "Best closet organizers under $30," "Closet organization mistakes to avoid," and "How I organized my closet in one afternoon." This creates a cluster of related content that keeps viewers on your channel.
Avoid the "welcome to my channel" video as your first upload. Nobody cares about you yet. They care about their problem. Solve it first, build trust, then introduce yourself in video five or ten.
Write a simple title and description for each video before you film. This keeps you focused and prevents the "I filmed this but have no idea what to call it" problem.
Film Your First Video With What You Have
According to OneStream, many successful creators started with just a phone. You do not need a $2,000 camera. You need decent lighting, clear audio, and something worth watching.
Lighting matters more than camera quality. Film facing a window during the day, or buy a cheap ring light. Avoid filming with a light source behind you, or you will be a dark silhouette.
Audio matters even more. Phone audio is usually fine if you are close to the camera in a quiet room. If your audio has echo, hang blankets or move to a smaller space. A $20 lavalier microphone clipped to your shirt will sound better than a built-in phone mic from across the room.
Framing: Position the camera at eye level. If you are filming on a phone, prop it on a stack of books. Leave a little space above your head (headroom) and do not cut off the top of your head or your chin.
Your first video will feel awkward. You will stumble over words, forget what you planned to say, and hate how you sound. Everyone does. Film it anyway. You will improve faster by publishing imperfect videos than by waiting until you feel ready.
Keep your first video short. Aim for five to eight minutes. According to OneStream, a viral hook in the first seconds is critical. If the introduction is boring, viewers scroll away. Start with the payoff, not the setup. Instead of "Hi, I'm Sarah, and today I am going to show you how to organize your closet," try "I fit 50 shirts in a closet the size of a refrigerator. Here is how."
Edit for Clarity, Not Perfection
You do not need Adobe Premiere or Final Cut Pro. Free tools like DaVinci Resolve, iMovie, or CapCut work fine. Your goal is to remove dead air, fix mistakes, and keep the pace moving.
Cut out long pauses, "ums," and false starts. If you repeat yourself, pick the better take and delete the other. If a section drags, speed it up or cut it entirely.
Add text on screen for key points. If you mention a product name, website, or statistic, put it on screen so viewers can read it. This helps people who watch without sound and reinforces your message.
Background music is optional. If you add it, keep it quiet. Viewers should hear your voice clearly. Use royalty-free music from YouTube's Audio Library (available in YouTube Studio) to avoid copyright strikes.
Do not obsess over transitions, effects, or color grading. Those things matter for advanced creators, but beginners waste hours tweaking details that do not affect whether someone clicks or subscribes. Focus on pacing and clarity.
Export your video at 1080p (1920 x 1080 resolution) and 30 frames per second. This is standard and uploads quickly. If you filmed in 4K, you can upload in 4K, but it is not necessary.
Create a Thumbnail That Gets Clicks
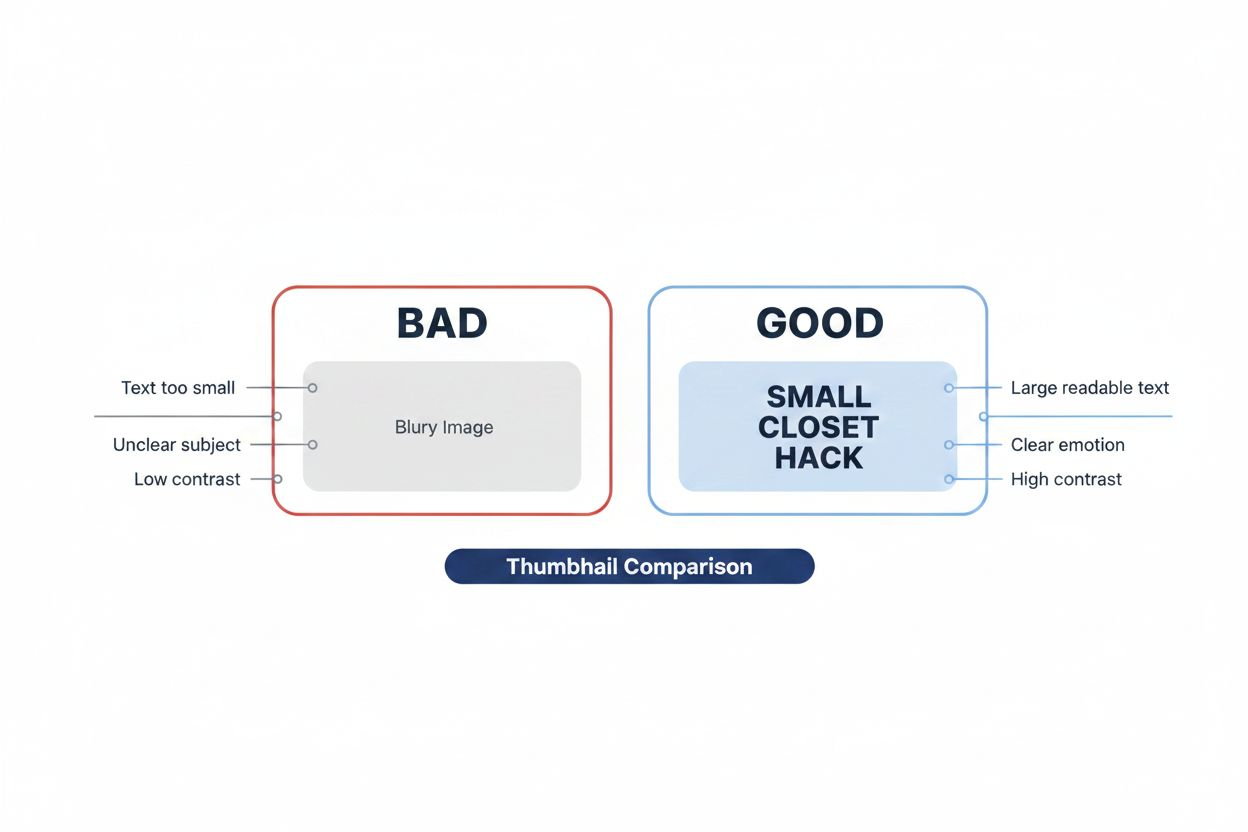
Your thumbnail is more important than your title. According to 1of10, thumbnails should use bright colors, strong contrast, and minimal text (ideally under five words).
Take a separate photo for your thumbnail. Do not use a random frame from your video. Set up good lighting, make an expressive face (surprised, excited, focused), and shoot from the same angle as your video so it feels cohesive.
Use a free tool like Canva or Photoshop to add text and graphics. Your text should be large and readable on a phone screen. If someone scrolling on mobile cannot read it, rewrite it or make it bigger.
Show the result, not the process. If your video is "How to organize a small closet," your thumbnail should show the organized closet, not you holding a hanger. People click on outcomes.
Use faces when possible. Thumbnails with human faces get more clicks than thumbnails without them, especially if the face shows emotion.
Avoid clickbait. If your thumbnail promises something your video does not deliver, viewers will leave immediately. YouTube tracks this (it is called bounce rate) and stops recommending your video.
Write a Title and Description That Help People Find You
Your title should include your target keyword and promise a clear benefit. If someone searches "how to start a YouTube channel," your title should contain that phrase. But it also needs to stand out from the 50 other videos with the same keyword.
Good title formula: [Keyword] + [Specific Benefit or Hook]
Examples:
- "How to Start a YouTube Channel (Even If You Hate Being on Camera)"
- "Small Closet Organization: 7 Hacks That Actually Work"
- "Beginner Guitar Lesson: Play Your First Song in 10 Minutes"
Keep titles under 60 characters so they do not get cut off in search results.
Your description should expand on the title. Write two to three sentences explaining what the video covers, then add timestamps if your video has multiple sections. Timestamps help viewers jump to the part they care about and signal to YouTube that your video is well-organized.
Example description:
"In this video, I show you how to organize a small closet using seven simple hacks. No expensive organizers required. You will learn how to maximize vertical space, store off-season clothes, and keep everything visible.
0:00 Introduction 0:45 Hack 1: Double your hanging space 2:10 Hack 2: Use shelf dividers 3:30 Hack 3: Store shoes vertically"
Add relevant links: your social media, related videos, products you mentioned, or your website. Include a call to action, like "Subscribe for more organization tips every Tuesday."
According to Medium, you can set upload defaults for titles, descriptions, and tags to maintain consistency. Go to YouTube Studio, then Settings, then Upload Defaults. Add a standard description template that includes your social links and a subscribe call to action. You can customize it for each video, but having a template saves time.
Add Tags and Choose the Right Category
Tags help YouTube understand your content. Add 5 to 10 tags that describe your video. Start with your main keyword, then add variations and related terms.
If your video is "How to organize a small closet," your tags might be:
- small closet organization
- closet organization ideas
- organize small spaces
- closet hacks
- home organization
Do not add irrelevant tags to try to game the system. YouTube penalizes this.
Choose a category when you upload. If your video is a tutorial, select "Howto & Style" or "Education." If it is a vlog, select "People & Blogs." The category helps YouTube recommend your video to the right audience.
Upload and Schedule Your Video
Go to YouTube Studio and click "Create," then "Upload videos." Drag your video file into the upload window. While it uploads, fill in your title, description, thumbnail, tags, and category.
Under "Audience," select whether your video is made for kids. If your content is not specifically designed for children under 13, select "No, it's not made for kids." This allows comments, notifications, and personalized ads.
Under "More options," you can add your video to a playlist. According to 1of10, playlists and end screens extend watch time, which the algorithm rewards. Create a playlist for your niche (like "Closet Organization Tips") and add this video to it.
You can publish immediately or schedule your video for a specific date and time. Scheduling helps you maintain a consistent upload schedule even if you batch-film videos.
Before you publish, check the visibility settings. "Public" means anyone can find and watch your video. "Unlisted" means only people with the link can watch. "Private" means only you and people you specifically invite can watch. For your first video, choose "Public."
Click "Publish" or "Schedule." Your video is live.
Add End Screens and Cards to Keep Viewers Watching
End screens appear in the last 5 to 20 seconds of your video. They let you promote another video, playlist, or channel, and include a subscribe button.
To add an end screen, go to YouTube Studio, select your video, click "Editor," then "End screen." YouTube offers templates, or you can create a custom layout. Add a "Best for viewer" element, which lets YouTube recommend your most relevant video to each person. Add a subscribe button. Keep it simple.
Cards are small notifications that pop up during your video. Use them to link to related videos, playlists, or external websites (if you are in the YouTube Partner Program). Add cards when you mention another video or topic. For example, if you say "I covered this in my last video," add a card linking to that video.
Both features keep viewers on your channel longer. According to 1of10, watch time is a key metric the algorithm uses to decide which videos to recommend.
Promote Your First Video Without Being Annoying
Share your video on social media, but do not just drop a link with "Check out my new video!" Explain why someone should watch. What problem does it solve? What will they learn?
Post in relevant online communities, but follow the rules. Many subreddits and Facebook groups ban self-promotion. If a community allows it, contribute to discussions first. Answer questions, leave thoughtful comments, and build credibility. Then, when appropriate, share your video as a resource.
Email your video to friends or family who might genuinely find it useful. Ask for honest feedback, not just "Great job!" Ask what confused them, what they wanted more of, and whether they would watch another video.
Do not buy views or subscribers. These services deliver fake engagement that hurts your channel. YouTube detects artificial inflation and can remove your channel from recommendations or ban you entirely.
Check Your Analytics and Learn What Works
After your video has been live for a few days, check YouTube Studio's Analytics tab. According to Medium, key metrics to monitor include watch time, audience retention, and click-through rate (CTR).
Watch time is the total minutes people spent watching your video. YouTube prioritizes videos that keep people on the platform longer.
Audience retention shows you where people drop off. If 50% of viewers leave in the first 30 seconds, your hook is weak. If they leave halfway through, your pacing might be slow or you are not delivering on the title's promise.
Click-through rate (CTR) is the percentage of people who saw your thumbnail and clicked. A CTR above 4% is decent for a new channel. If your CTR is below 2%, test a new thumbnail or title.
Look at traffic sources. Are people finding you through search, suggested videos, or external sources? If search is your main source, your SEO is working. If suggested videos is your main source, YouTube's algorithm is recommending you.
Do not obsess over subscriber count. Focus on watch time and retention. A channel with 100 engaged subscribers who watch every video is healthier than a channel with 1,000 subscribers who never watch.
Set a Realistic Upload Schedule and Stick to It
Consistency matters more than frequency. One video every two weeks that you can maintain is better than three videos a week that burns you out after a month.
Pick a schedule you can sustain for six months. If you work full-time and have limited free time, start with one video every two weeks. If you have more time, try weekly uploads.
Tell your audience your schedule. Put it in your banner, mention it in your videos, and stick to it. Subscribers are more likely to return if they know when to expect new content.
Batch-film when possible. Set aside one day to film three or four videos, then edit and schedule them over the following weeks. This prevents the "I need to film something today" panic.
If you miss an upload, do not apologize in your next video. Just get back on schedule. Viewers do not track your upload dates as closely as you think.
Keep Improving, One Video at a Time
Your first video will not be great. Your tenth might not be either. That is normal. Every successful YouTuber started with awkward, low-view videos.
Watch your own videos and take notes. What felt clunky? What could you explain more clearly? What did you enjoy filming?
Watch creators in your niche. Do not copy them, but study their structure. How do they open their videos? How do they keep energy up? How do they end?
Invest in better equipment slowly. Start with lighting, then audio, then camera. Each upgrade should solve a specific problem, not just be an excuse to delay publishing.
Ignore vanity metrics early on. Views and subscribers will grow slowly at first. Focus on making each video better than the last.
Your channel will find its voice. You will figure out what topics resonate, what format you enjoy, and what your audience responds to. But you can only learn this by publishing, analyzing, and iterating.
The hardest part is starting. You have done that. Now keep going.