How to Create a Free YouTube Channel: Complete Setup Guide for Beginners
You want to start making videos. You have ideas, maybe some equipment, and a Google account. That's all you need. According to YouTube Help, creating a YouTube channel requires only a Google Account and is completely free.
No hidden fees. No trial periods. No credit card required. The platform that hosts billions of videos and pays creators millions of dollars costs nothing to join. This guide walks you through every step, from clicking "Create Channel" to uploading your first video with settings that help people find it.
What You Actually Need Before You Start
Most people overthink this. You need a Google Account. That's the only requirement.
If you already use Gmail, Google Drive, or any Google service, you have one. If not, creating a Google Account takes two minutes at accounts.google.com. Pick a username, set a password, and you're ready.
According to YouTube Help, you can connect your channel to a Brand Account to use a different name than your Google Account. This matters if your Gmail is "[email protected]" but you want your channel to be called "Tech Explained Simply." Brand Accounts let you separate your personal Google identity from your public YouTube presence.
You do not need a camera yet. You do not need editing software. You do not need a logo, intro animation, or any of the polish you see on established channels. Those come later. Right now, you need an account and a plan.
Creating Your Channel in Five Minutes
Log into YouTube at youtube.com. Click your profile picture in the top right corner. If you see "Create a channel" in the dropdown menu, click it. If you already have a channel, you'll see "Your channel" instead.
YouTube offers two options: use your name or use a custom name. Your name pulls directly from your Google Account. Custom name lets you create a Brand Account with whatever channel name you want.
For most creators, custom name makes sense. You can call your channel anything: "Daily Recipes," "Fitness After 40," "Brooklyn Street Photography." Your personal Gmail stays private.
After you pick a name, YouTube creates your channel instantly. You now have a channel page with a URL, a place to upload videos, and access to YouTube Studio (the dashboard where you manage everything).
According to YouTube Help, to upload videos, comment, or make playlists, you need a YouTube channel—watching and liking only requires a Google Account. You just crossed that threshold.
Setting Up Your Channel Profile
Your channel page is bare. No banner image, no profile picture, no description. Viewers who land here see a blank slate. That's fine for now, but adding basic information helps people understand what you're about.
Profile Picture
This appears next to every video you upload and every comment you make. It shows up small (90 x 90 pixels), so simple images work better than detailed ones. Many creators use:
- A headshot (for personal brands)
- A logo (for topic-focused channels)
- An icon that represents their niche (a camera for photography channels, a dumbbell for fitness)
Upload a square image at least 800 x 800 pixels. YouTube will resize it. Avoid text in your profile picture. It becomes unreadable at thumbnail size.
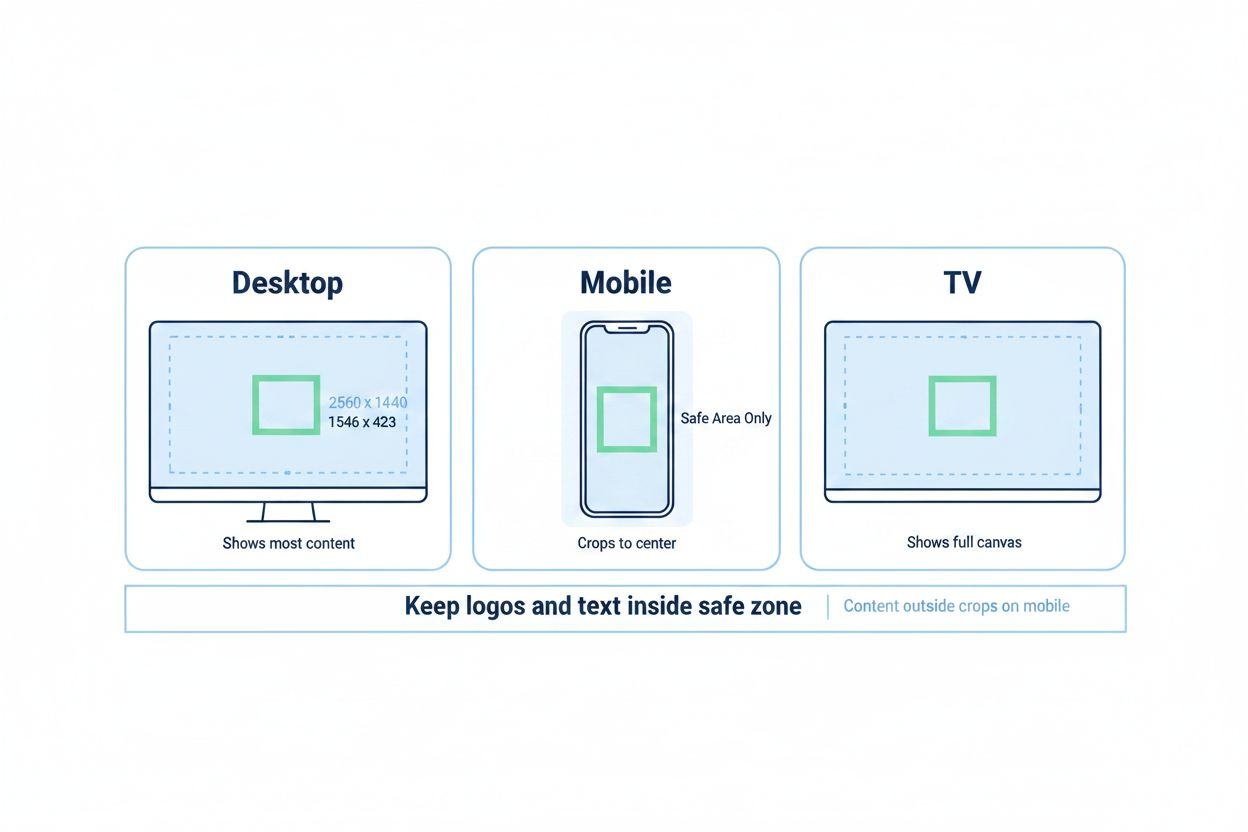
Banner Image
The banner stretches across the top of your channel page. It displays differently on desktop (2560 x 1440 pixels), mobile, and TV, so YouTube recommends a "safe area" in the center where critical elements stay visible across all devices.
You can create a banner in Canva (free), Photoshop, or even Google Slides. Keep text and important visuals in the center 1546 x 423 pixel area. The outer edges may get cropped on smaller screens.
What should your banner say? Your upload schedule ("New videos every Tuesday"), your topic ("Personal Finance for Millennials"), or your tagline. Keep it short. Many successful channels use just their name and a simple background.
Channel Description
This appears in the "About" tab. Write 100-200 words explaining what your channel covers and who it's for. Use your target keyword naturally. If you're making a free YouTube channel about woodworking, say so: "This channel teaches woodworking techniques for beginners, with free project plans and step-by-step tutorials."
Include relevant keywords for searchability, but write for humans first. The description also appears in search results when people look for channels, so clarity beats cleverness.
Links
You can add up to five links to your banner. These might point to your website, Instagram, email newsletter, or other social profiles. You don't need these on day one, but they're useful once you have a presence elsewhere.
Choosing Your Niche and Content Direction
According to Milanote, choosing a niche is the foundational step that gives your channel a clear identity. A niche is not a straitjacket. It's a starting point that helps you focus and helps viewers know what to expect.
Broad channels ("I make videos about whatever interests me") struggle to build audiences. Focused channels ("I review budget gaming laptops under $800") attract people searching for exactly that content.
Your niche should sit at the intersection of three things:
- What you know or want to learn
- What people search for on YouTube
- What you can talk about consistently
If you love cooking but hate being on camera, recipe videos might not work. If you're passionate about 18th-century naval history but there are 50 established channels covering it, you'll need a unique angle.
Search YouTube for topics you're considering. Look at view counts. Read comments. What questions do people ask repeatedly? What do existing videos miss? Where's the gap you can fill?
You can pivot later. Many successful channels started in one niche and shifted as the creator learned what resonated. But starting with focus beats starting with confusion.
Planning Your First Five Videos
According to Milanote, planning content in advance ensures a steady flow and keeps viewers engaged. Before you upload anything, map out your first five videos.
Why five? It gives new visitors multiple videos to watch. It forces you to think beyond a single idea. It builds momentum.
Your first video should answer one of these questions:
- What is [topic] and why does it matter?
- How do I [solve specific problem]?
- What are the biggest mistakes beginners make with [topic]?
Make it useful. Make it specific. A video titled "Photography Tips" competes with millions of others. "How to Shoot Sharp Photos in Low Light with a Kit Lens" targets a specific problem.
Videos two through five should expand on related topics. If your first video explains how to shoot in low light, the next might cover editing those photos, choosing affordable lenses, or shooting in different low-light scenarios (concerts, restaurants, night streets).
Write down working titles. You'll refine them later, but having a plan prevents the "what should I make next?" paralysis that kills channels in month two.
Recording Your First Video Without Fancy Gear
You do not need a $2,000 camera. Most smartphones shoot 4K video. The camera is not your bottleneck. Audio and lighting matter more.
Audio
Bad audio makes people click away faster than bad video. If viewers can't understand you, they leave. Your phone's built-in microphone might work if you're close to it in a quiet room. For $20-50, a lavalier mic that clips to your shirt improves quality dramatically.
Test your audio. Record 30 seconds, play it back. Can you hear every word clearly? Is there echo, hum, or background noise? Fix those before recording a full video.
Lighting
Face a window during daytime. Natural light is free and flattering. If you're recording at night, add lamps. Position one light source in front of you (slightly to the side) to avoid flat, washed-out footage.
Avoid recording with a bright window behind you. Your camera will expose for the window, turning you into a dark silhouette.
Framing
Position the camera at eye level. Looking down at a laptop camera creates an unflattering angle. Stack books under your laptop or phone to raise it.
Center yourself in the frame with a little space above your head. Too much headroom looks awkward. Too little makes the frame feel cramped.
Recording Tips
Speak slightly louder and more clearly than normal conversation. Cameras compress dynamic range. What sounds emphatic to you sounds normal on playback.
Pause between sentences. This gives you clean edit points. If you mess up, stop, take a breath, and start that sentence again. You'll cut out the mistake in editing.
Record in a quiet space. Turn off fans, close windows, silence your phone. Background noise you ignore while recording becomes distracting in the final video.
Editing Basics for Your First Upload
Free editing software exists for every platform. iMovie (Mac), DaVinci Resolve (Windows, Mac, Linux), and CapCut (mobile, desktop) all work. Pick one and learn the basics: cutting clips, adding text, adjusting audio.
Your first edit should focus on three things:
- Cut out mistakes, long pauses, and filler words ("um," "uh," "like")
- Add a simple title card at the start (your video title on screen for 3-5 seconds)
- Make sure audio levels are consistent (no sudden loud or quiet sections)
Fancy transitions, animations, and effects can wait. Clear, well-paced content beats flashy editing with weak content.
Export your video at 1080p (1920 x 1080) if possible. YouTube accepts 4K, but 1080p is fine for starting out. Use the highest quality export setting your software offers. File size doesn't matter. YouTube will compress it anyway.
Uploading Your Video the Right Way
In YouTube Studio (studio.youtube.com), click "Create" then "Upload videos." Drag your video file into the upload window.
While the video uploads, you'll fill out several fields. These determine whether people find your video.
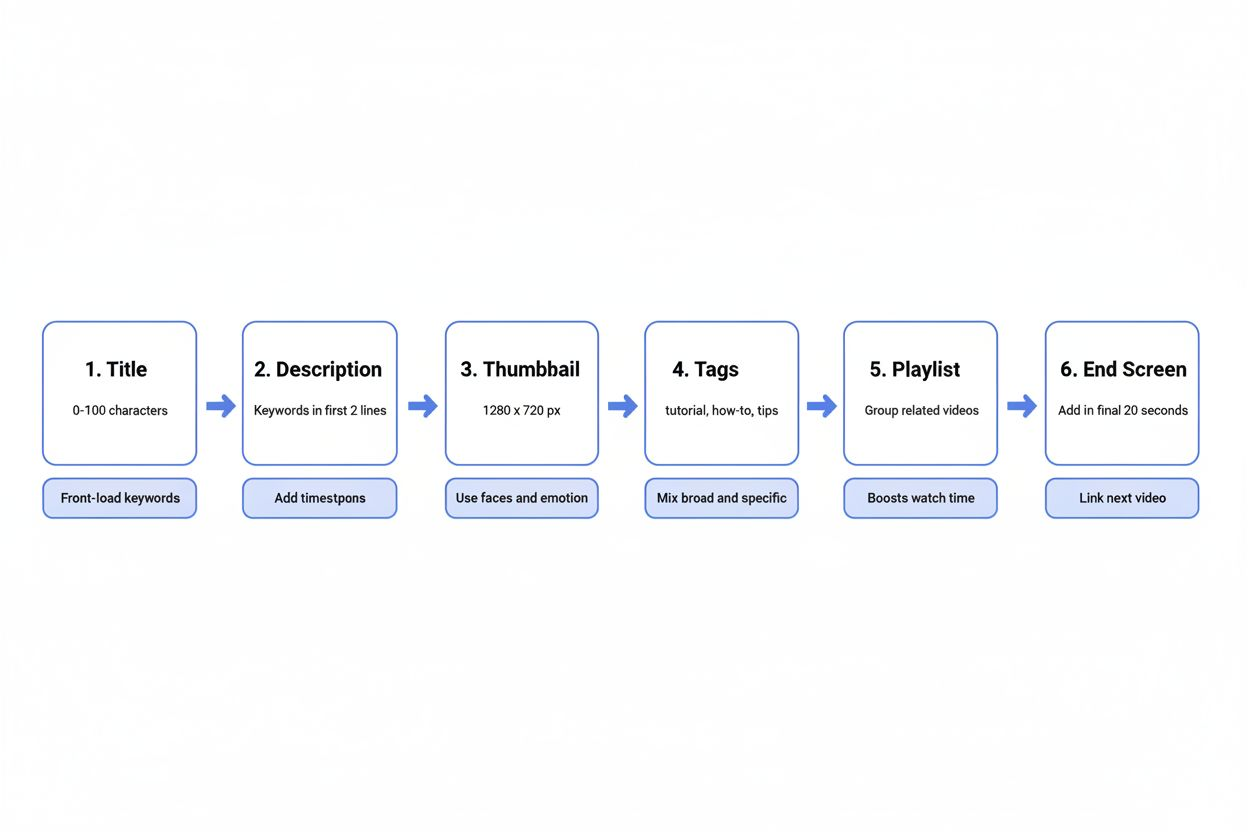
Title
Your title should be clear, specific, and include your target keyword. "How to Change a Tire" is better than "Car Maintenance Tips." "How to Change a Tire in 10 Minutes Without a Jack" is even better.
Keep titles under 60 characters when possible. Longer titles get cut off in search results and suggested videos.
Description
Write at least 200 words. The first two lines appear in search results, so make them count. Explain what the video covers and who it's for.
Include your keyword naturally in the first paragraph. Add timestamps if your video has distinct sections (0:00 Intro, 1:30 Step One, 4:15 Step Two). Timestamps help viewers jump to relevant parts and signal to YouTube that your video is well-organized.
Link to related videos, your social media, or resources you mention. The description is searchable, so relevant keywords help YouTube understand your content.
Thumbnail
YouTube auto-generates three thumbnail options from your video. These usually look terrible (mid-blink, mouth half-open, blurry). Upload a custom thumbnail instead.
Thumbnails should be 1280 x 720 pixels, under 2 MB, and saved as JPG or PNG. Use large text (if any), high contrast, and clear images. Your thumbnail competes with hundreds of others. It needs to stand out at small sizes.
Many creators use their face (showing emotion), bold text (5-7 words max), and bright colors. Look at successful videos in your niche. What do their thumbnails have in common?
Tags
Tags matter less than they used to, but add 5-10 relevant ones. Include your target keyword, variations of it, and related terms. If your video is "How to Change a Tire," tags might include: tire change, flat tire repair, car maintenance, roadside emergency.
Playlist
Create a playlist for your video topic. If this is your first video about car maintenance, create a "Car Maintenance Basics" playlist and add the video to it. Playlists keep viewers watching multiple videos, which YouTube rewards.
End Screen
In the last 5-20 seconds of your video, add an end screen promoting another video or your channel. YouTube Studio has templates. Pick one, select which video to promote, and position the elements. End screens increase watch time by guiding viewers to more content.
Handling Music and Copyright Without Getting Strikes
According to Uppbeat, YouTube uses a Content ID fingerprinting system that can flag copyrighted music and issue copyright strikes. Using a popular song without permission can get your video muted, demonetized, or removed.
Three copyright strikes and YouTube deletes your channel. Permanently.
Avoid this by using copyright-free music. According to Uppbeat, quality copyright-free music is available at no cost to avoid Content ID claims.
Free music sources include:
- YouTube Audio Library (built into YouTube Studio, fully cleared for use)
- Free Music Archive (various licenses, check each track)
- Incompetech (royalty-free with attribution)
- Uppbeat (free tier available)
Always check the license. Some tracks require attribution (crediting the artist in your description). Some allow commercial use, others don't. Read the terms.
If you're talking over your entire video, you might not need music. Silence is better than risky music.
Setting Your Publishing Schedule
According to Milanote, consistency is essential for growing your audience—decide on a realistic posting schedule (weekly, bi-weekly, or monthly) and stick to it.
YouTube's algorithm favors channels that upload regularly. Viewers subscribe when they know when to expect new content. Consistency beats volume. One video every Tuesday is better than three videos one week and nothing for a month.
Pick a schedule you can maintain for six months. If you have two hours per week for YouTube, that might mean one 8-minute video every two weeks. If you have ten hours per week, you might manage two videos weekly.
Be honest about your time. Life happens. Jobs, family, and other commitments don't pause for YouTube. Starting with a monthly schedule and increasing frequency later is smarter than burning out in month two.
Announce your schedule in your channel banner, video descriptions, and videos themselves. "New videos every Saturday at 10 AM" sets expectations.
Promoting Your First Video Without Spending Money
You uploaded your video. Now what? Waiting for YouTube to recommend it to millions of people doesn't work. New channels have no watch history, no subscriber base, and no algorithmic trust. You need to drive initial traffic yourself.
Share your video where your potential audience already gathers:
- Reddit (find subreddits related to your topic, follow their self-promotion rules)
- Facebook groups (join groups interested in your niche, contribute helpfully, share your video when relevant)
- Twitter/X (use relevant hashtags, engage with people discussing your topic)
- Forums and communities (participate genuinely, share your video when it answers someone's question)
Do not spam. Do not drop links without context. Communities ban self-promoters who don't contribute. Share your video as a resource when it genuinely helps someone.
Ask friends and family to watch, like, and comment. Early engagement signals to YouTube that your video is worth recommending. A video with 50 views and 10 comments looks more engaging than one with 500 views and zero comments.
Respond to every comment in your first few weeks. It boosts engagement metrics and shows viewers you're active.
Understanding YouTube Studio Basics
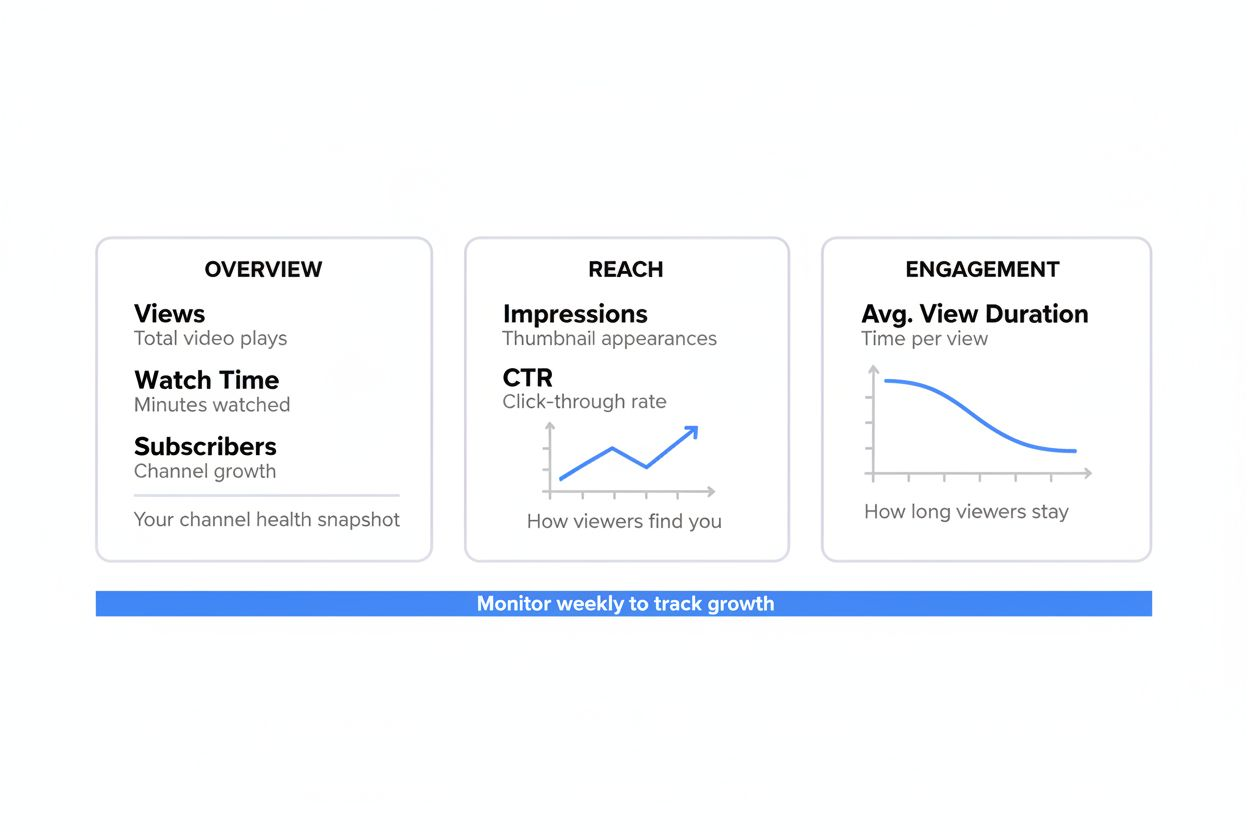
YouTube Studio is your control center. The dashboard shows:
- Views, watch time, and subscriber changes (updated hourly)
- Which videos are performing well
- Where your traffic comes from (search, suggested videos, external sites)
- Audience demographics (age, gender, location)
Check your analytics weekly. Look for patterns. Which videos get the most watch time? Where do viewers drop off? What search terms bring people to your videos?
The "Reach" tab shows impressions (how many times your thumbnail was shown) and click-through rate (what percentage of people clicked). Low CTR means your thumbnail or title needs work. High CTR but low watch time means your content didn't match expectations.
The "Engagement" tab shows average view duration. If people watch 30% of your 10-minute video, they're leaving after three minutes. That's your signal to tighten your pacing, cut fluff, or restructure your content.
Use this data to improve. YouTube tells you exactly what's working. Listen.
Common Mistakes New Channels Make
Inconsistent Uploads
Uploading three videos in one week, then nothing for two months kills momentum. Subscribers forget about you. The algorithm stops recommending your content. Pick a sustainable pace.
Ignoring Thumbnails
Auto-generated thumbnails look amateurish. Custom thumbnails increase your click-through rate significantly. Spend 15 minutes designing one for every video.
Vague Titles
"My Thoughts on Marketing" tells viewers nothing. "3 Email Marketing Mistakes That Cost Me $10,000" is specific and compelling. Be clear about what value you're offering.
Talking to Everyone
Channels that try to appeal to everyone appeal to no one. Narrow your focus. Serve a specific audience well. You can expand later.
Giving Up Too Soon
Most channels see little growth in the first three months. That's normal. YouTube needs time to understand your content and find your audience. Channels that upload consistently for six months see dramatically better results than those that quit after five videos.
Copying Successful Channels Exactly
Study successful creators in your niche, but don't clone them. Viewers already have the original. They don't need a copy. Find your angle, your voice, your perspective.
What Happens After Your First Upload
Your first video will probably get 10-100 views unless you already have an audience elsewhere. That's fine. You're learning.
Your second video will be better. You'll know your editing software. You'll speak more naturally on camera. Your thumbnails will improve.
By video five, you'll have a clearer sense of what works. By video ten, you'll have enough data to see patterns in your analytics.
Growth is not linear. Some videos will flop. Some will surprise you. A video you think is mediocre might get picked up by the algorithm six months later and bring thousands of new subscribers.
The creators who succeed are the ones who keep uploading. They improve with each video. They learn from their analytics. They adapt.
According to Uppbeat, setting up your own YouTube channel is completely free. The barrier to entry is low. The barrier to success is persistence.
Next Steps for Your Free YouTube Channel
You have a channel. You know how to upload. You understand the basics of titles, descriptions, and thumbnails. Now you need to make videos.
Focus on these priorities for your first three months:
- Upload consistently (whatever schedule you set, stick to it)
- Improve one thing with each video (audio, lighting, pacing, thumbnails)
- Study your analytics (what's working, what's not)
- Engage with your audience (respond to comments, ask for feedback)
- Watch successful channels in your niche (learn from their structure, pacing, and presentation)
You don't need expensive equipment. You don't need a huge subscriber count. You need consistency, clarity, and a willingness to improve.
Your free YouTube channel costs nothing but time. The question is whether you'll invest that time consistently enough to see results. Most people won't. That's your advantage.
Start recording.