How to Build a Complete YouTube Creator Toolkit Without Spending a Dollar
You want to start a YouTube channel, but the advice online makes it sound expensive. Professional cameras. Editing software subscriptions. Thumbnail designers. SEO tools that cost $50 per month.
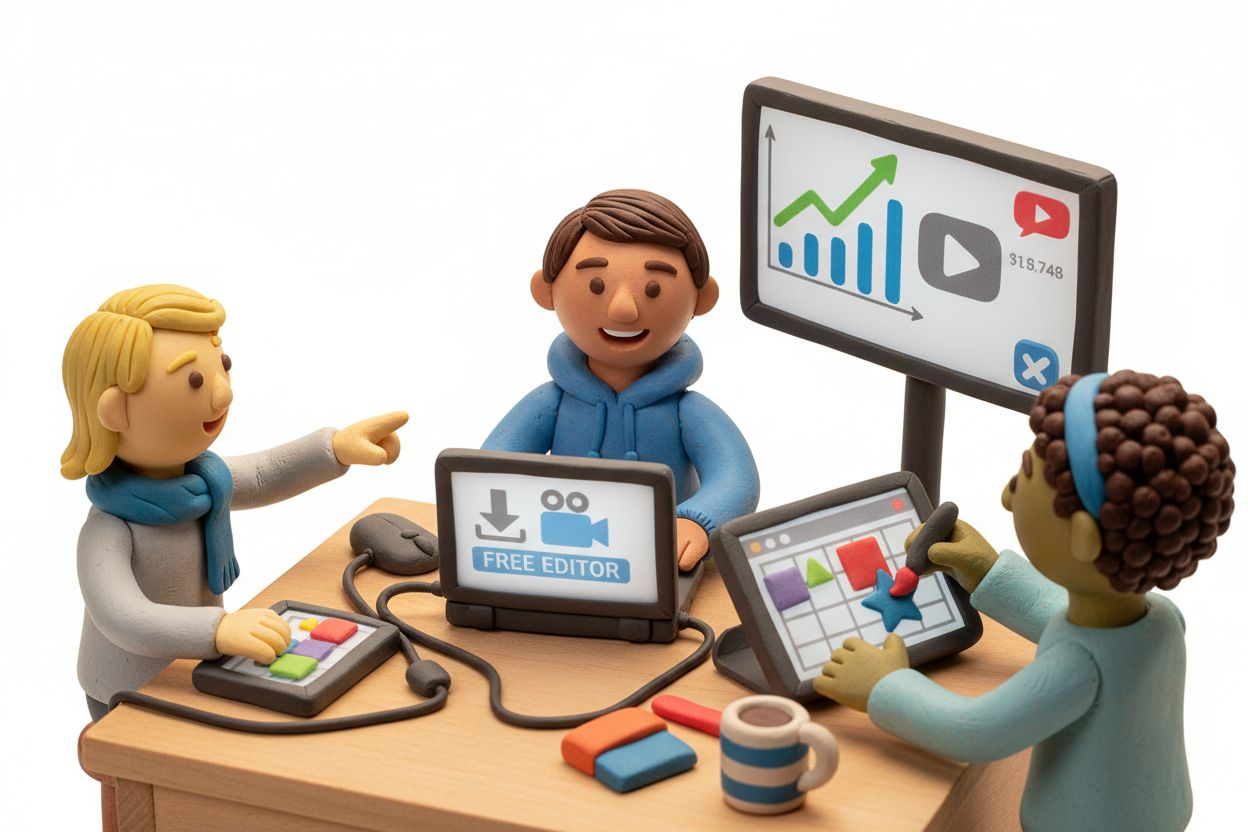
Here's what most guides won't tell you: you can build a complete creator toolkit for zero dollars. The same tools professionals use to edit blockbuster films, analyze performance data, and optimize for search are available free. You just need to know where to look and how to set them up.
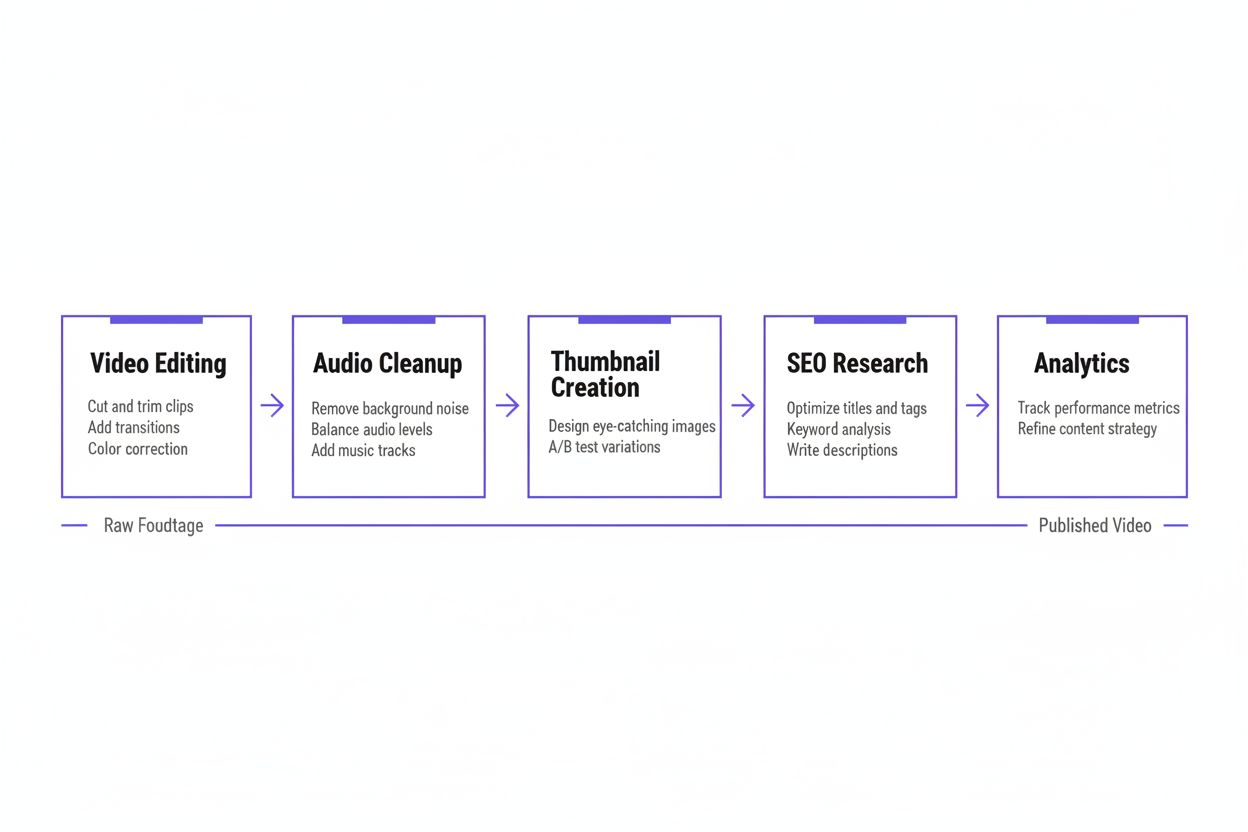
This guide walks you through building a zero-cost YouTube toolkit that covers every essential function: editing, audio cleanup, thumbnail creation, SEO research, analytics, and voiceovers. By the end, you'll have a working system that lets you create, publish, and grow without opening your wallet.
What You Actually Need (And What You Don't)
Before downloading anything, understand what matters.
New creators waste time on tools that don't move the needle. You don't need fancy transitions or motion graphics templates. You don't need 47 different analytics dashboards. You need five core capabilities:
- Video editing that handles cuts, basic effects, and color correction
- Audio cleanup to remove background noise and balance levels
- Thumbnail creation with text and simple graphics
- SEO research to find what people search for and what tags competitors use
- Analytics to see what works and what doesn't
Everything else is optional. Start with these five, then add tools only when you hit a specific limitation.
Setting Up Your Free Video Editor
According to Uppbeat, DaVinci Resolve is completely free and has been used in post-production on Marvel films, Star Wars, and James Bond. That's not marketing talk. The free version is the same software used on major productions, minus a few advanced features you won't need for YouTube.
Download DaVinci Resolve from Blackmagic Design's website. The download is large (around 3GB), so start it and move to the next section while it completes.
When you first open DaVinci Resolve, the interface looks overwhelming. Ignore most of it. You'll use three tabs: Cut (for basic editing), Fairlight (for audio), and Deliver (for export).
Your first project setup:
Start a new project. Set your timeline resolution to 1920x1080 (1080p) or 3840x2160 (4K) depending on what your camera records. Frame rate should match your footage, usually 24, 30, or 60 frames per second.
Import your video files by dragging them into the media pool. Drag a clip to the timeline. That's your first edit.
Basic editing workflow:
The blade tool (keyboard shortcut: B) cuts clips. Click where you want to cut, then delete the section you don't want. The selection tool (keyboard shortcut: A) lets you move clips around.
For smooth transitions between clips, overlap them slightly and DaVinci will automatically create a cross-dissolve. Most YouTube videos need nothing fancier.
Color correction lives in the Color tab, but start simple. The primary color wheels let you adjust shadows, midtones, and highlights. If your footage looks washed out, drag the middle wheel down slightly. If it's too dark, drag it up. Small adjustments make a bigger difference than you'd expect.
Export settings that work:
In the Deliver tab, choose YouTube as your preset. This automatically configures the codec (H.264), quality, and format. Name your file and click "Add to Render Queue," then "Start Render."
Your first export will take time. DaVinci processes every frame. A 10-minute video might take 20-30 minutes to render on an average laptop. This is normal.
Cleaning Up Your Audio
According to LernClicks, audio quality is critical because poor audio causes viewers to click away even if video footage is excellent. People tolerate mediocre video quality, but bad audio is unwatchable.
You have two options: clean audio inside DaVinci Resolve or use Audacity for more control.
DaVinci Resolve audio cleanup:
In the Fairlight tab, select your audio clip. Open the Effects Library and drag "Dynamics" onto your clip. This compressor evens out volume levels so quiet parts are audible and loud parts don't distort.
For background noise, use the "Noise Reduction" effect. Play a section where you're not talking (just background noise), then click "Learn" in the Noise Reduction panel. DaVinci analyzes that noise profile and removes it from the entire clip.
Audacity for detailed work:
Download Audacity from audacityteam.org. It's free, open-source, and handles audio editing that DaVinci makes difficult.
Import your audio file. Select a section of pure background noise (no voice), then go to Effect > Noise Reduction > Get Noise Profile. Select the entire track (Ctrl+A), then Effect > Noise Reduction > OK. Audacity removes that noise pattern from the whole file.
LernClicks notes that free tools like Audacity can remove background noise, balance levels, and improve voice clarity. The Normalize effect (Effect > Normalize) brings your audio to a consistent volume level. The Compressor (Effect > Compressor) makes quiet words louder without making loud words distort.
Export as WAV or MP3, then import the cleaned audio back into DaVinci Resolve, replacing the original.
Creating Thumbnails That Get Clicks
Your thumbnail determines whether anyone watches your video. YouTube shows your thumbnail hundreds or thousands of times. A small improvement in click-through rate means hundreds more views.
Canva for thumbnail design:
Create a free Canva account. Search for "YouTube thumbnail" templates. Canva provides dozens of free templates sized correctly (1280x720 pixels).
Pick a template close to what you want, then customize it. Replace the background image with a screenshot from your video. Change the text to your video title or a shortened version.
Thumbnail design rules that work:
Use high contrast. Your thumbnail appears small on mobile screens. Light text on dark backgrounds or dark text on light backgrounds reads clearly. Mid-tone combinations disappear.
Faces work when they show clear emotion. A neutral expression does nothing. Surprise, excitement, confusion, or concern catch attention. If you're in the thumbnail, make sure your face is large enough to see the expression.
Text should be five words maximum. Viewers scan thumbnails in under a second. Long text gets ignored.
According to Gyre, ThumbnailCheck lets creators preview how thumbnails look before publishing to stand out in search. Visit thumbnailcheck.com and upload your design. The tool shows how your thumbnail appears in search results, suggested videos, and mobile views. This preview reveals problems you'd miss in Canva's editor.
Testing thumbnail variations:
Create three versions of each thumbnail with different text, colors, or images. Upload them to ThumbnailCheck and compare. The version that catches your eye first in the search results preview usually performs best.
Save your final thumbnail as a PNG file. JPG works too, but PNG preserves quality better for graphics and text.
Finding What People Actually Search For
SEO research sounds technical. It's not. You're answering one question: what words do people type into YouTube's search box when they want content like yours?
YouTube's search box method:
Open YouTube in a private/incognito browser window (this prevents your personal search history from affecting results). Start typing a topic related to your video.
YouTube's autocomplete shows popular searches. If you type "how to edit," YouTube suggests "how to edit videos on phone," "how to edit photos," "how to edit youtube videos." These are real searches from real people.
Type variations of your topic and screenshot the suggestions. These become your keyword list.
TubeBuddy's free features:
TubeBuddy offers a free browser extension that adds data to YouTube's interface. Install it from tubebuddy.com.
According to Gyre, TubeBuddy's free "videolytics" feature shows hidden tags, performance data, and engagement stats. When you watch any YouTube video, TubeBuddy displays the tags that creator used, the video's search rankings, and engagement metrics.
Find successful videos in your niche. Check their tags with TubeBuddy. You'll see patterns. Certain tags appear on every high-performing video in a topic. Those are your target keywords.
Building your keyword strategy:
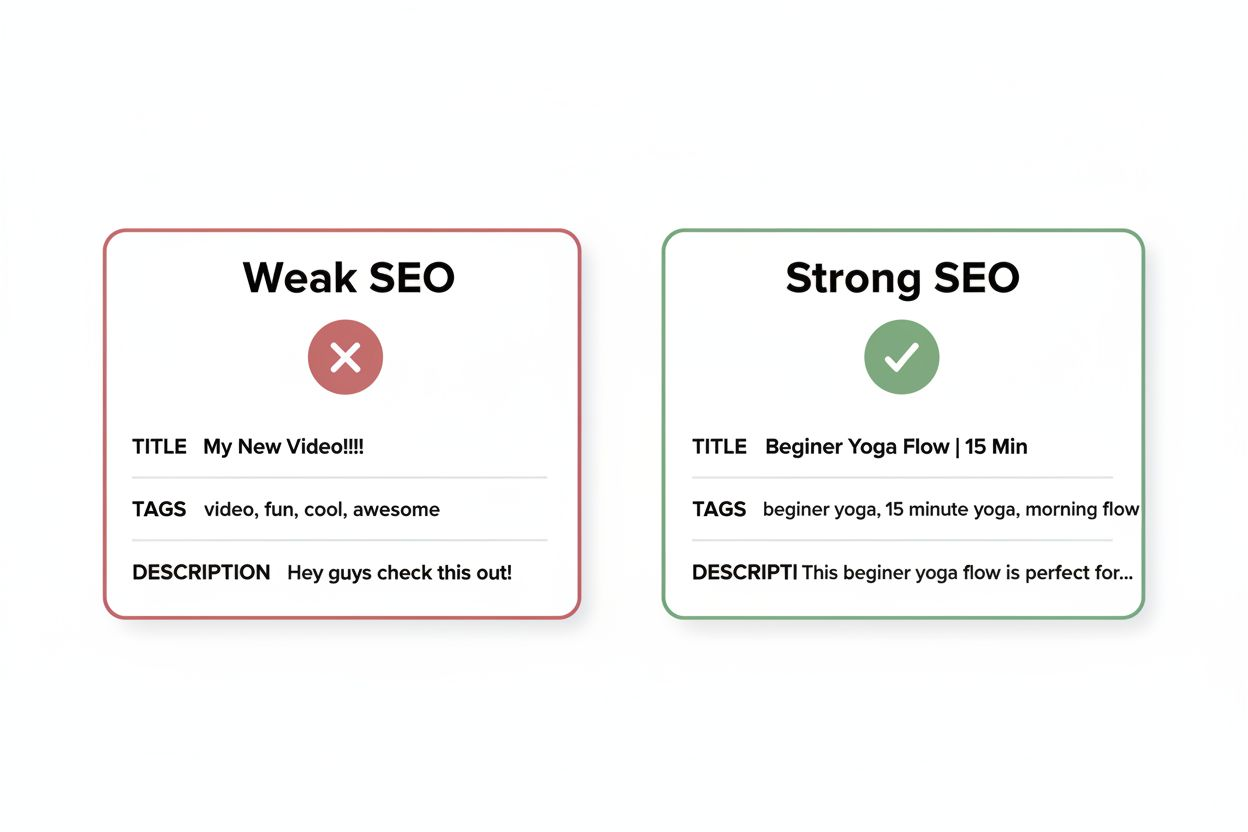
Pick one main keyword for your video title. This should be a phrase people actually search for, not something clever or vague. "How to remove background noise in Audacity" beats "Audio editing tips."
Use 3-5 related keywords as tags. If your main keyword is "how to remove background noise in Audacity," your tags might include "audacity tutorial," "remove background noise," "audio editing free," "clean audio recording."
Put your main keyword in your video description's first sentence. YouTube's algorithm reads the description to understand your content.
Understanding What Works With YouTube Studio
You don't need third-party analytics tools when you're starting. YouTube Studio provides everything you need to understand your performance.
According to LernClicks, YouTube Studio shows exactly where viewers drop off, what gets clicks, and how audiences find videos.
The metrics that matter:
Click-through rate (CTR) measures how often people click your thumbnail when they see it. A CTR above 4% is decent for new channels. Above 8% is strong. Below 2% means your thumbnail or title needs work.
Average view duration tells you how long people watch. If viewers leave after 30 seconds on a 10-minute video, something's wrong with your intro or the video doesn't match what the title promised.
Traffic sources show how people found your video. "YouTube search" means your SEO works. "Suggested videos" means YouTube's algorithm recommends your content. "External" means traffic from other websites or social media.
Reading the audience retention graph:
Open any video in YouTube Studio and click Analytics, then Reach, then Average View Duration. The graph shows exactly when people leave.
A sharp drop at the start means your intro is too slow. Get to the point faster. A gradual decline is normal. A sudden drop at a specific timestamp means something went wrong at that moment (maybe you went off-topic or the audio cut out).
Compare your retention graph to your script or edit. You'll see patterns. Certain types of content hold attention better than others.
Using data to improve:
Look at your top 10 videos by views. What do they have in common? Similar topics? Similar thumbnail styles? Similar video lengths?
Look at your bottom 10 videos. What's different? Often you'll find they have vague titles, weak thumbnails, or topics that seemed interesting to you but don't match what your audience wants.
Make more of what works. Stop making what doesn't. This sounds obvious, but most creators ignore their data and keep making videos based on what they feel like creating.
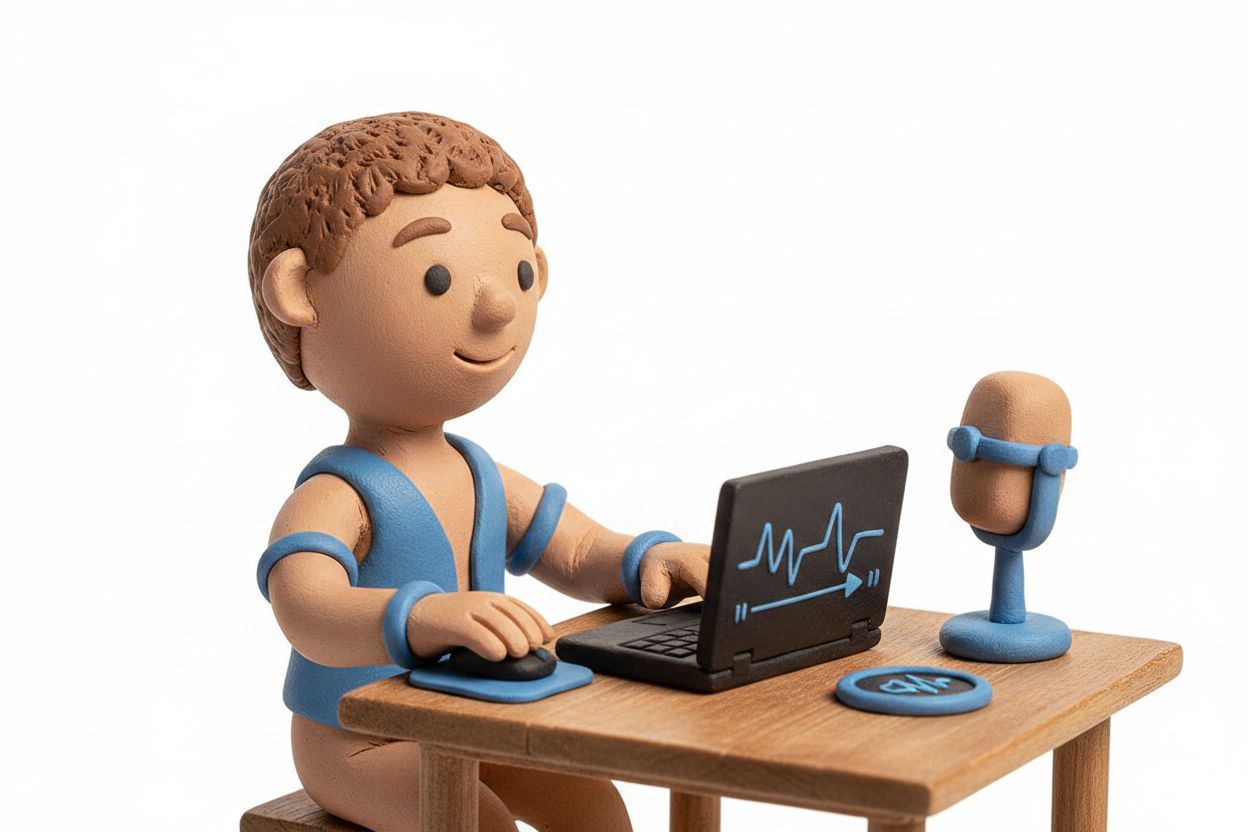
Adding Professional Voiceovers When You Need Them
Some videos work better with voiceover narration than talking-head footage. Product reviews, tutorials, and explainer videos often use voiceover over screen recordings or B-roll.
According to Gyre, ElevenLabs free version supports 14 languages and 10,000 characters per month for AI voiceovers.
When to use AI voiceover:
AI voices work for specific use cases. Screen recording tutorials where you're demonstrating software. Slideshow-style videos with text and graphics. Narration over stock footage or B-roll.
They don't work when personality matters. If your channel's appeal is you and your perspective, use your real voice. Viewers connect with humans, not robots.
Setting up ElevenLabs:
Create a free account at elevenlabs.io. The free tier gives you 10,000 characters per month. That's roughly 10 minutes of narration.
Write your script in a text editor first. Count the characters (most word processors show this). If you're over 10,000 characters, split the script across multiple months or trim it down.
Paste your script into ElevenLabs. Choose a voice that matches your content's tone. Professional and neutral for educational content. Energetic for entertainment. Calm for meditation or sleep content.
Generate the audio and download the MP3 file. Import it into DaVinci Resolve and sync it with your visuals.
Making AI voices sound natural:
Add punctuation. Commas create brief pauses. Periods create longer pauses. This prevents the robotic run-on effect.
Break long sentences into shorter ones. AI voices handle simple sentence structures better than complex ones.
Listen to the output before committing. Sometimes a word gets mispronounced or the emphasis falls in the wrong place. Rewrite that sentence and regenerate just that section.
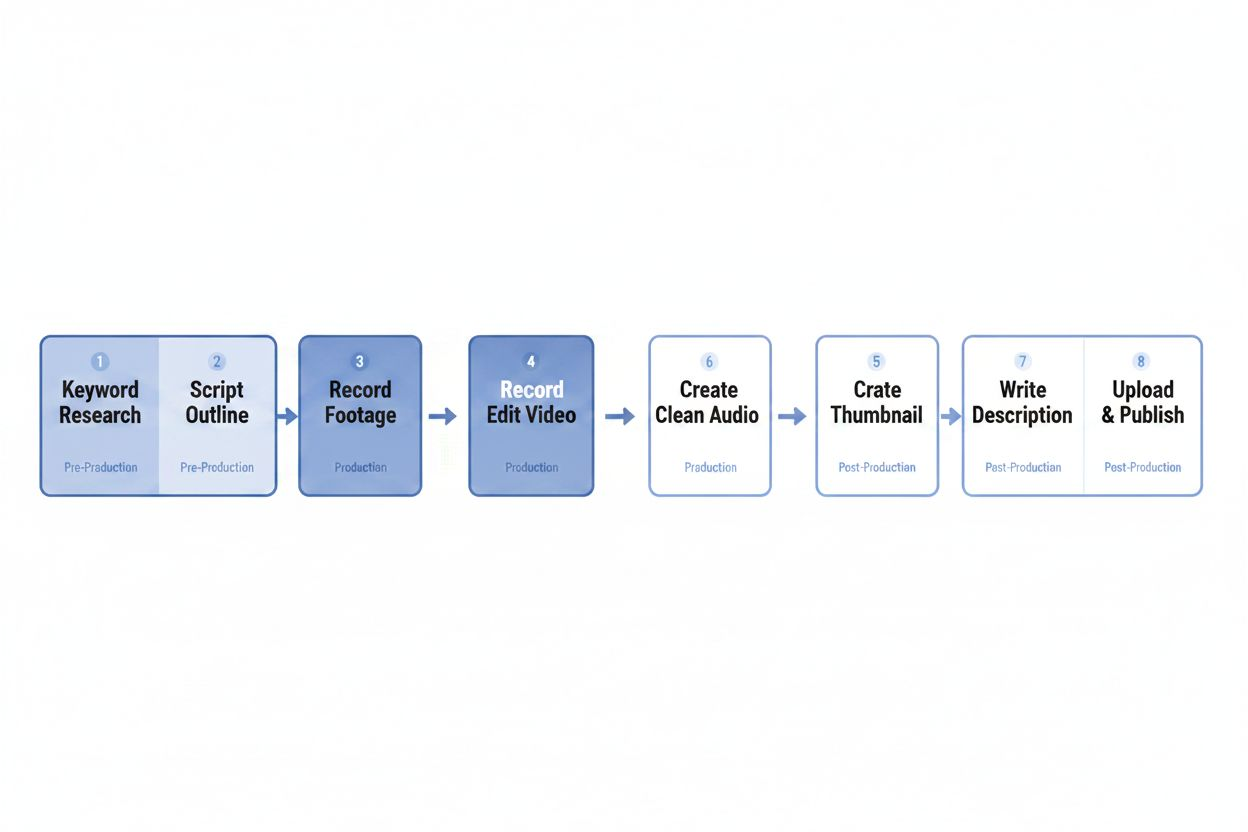
Your First Video Workflow From Start to Finish
You have the tools. Now put them together into a repeatable process.
Pre-production (before you record):
Research keywords using YouTube autocomplete and TubeBuddy. Pick your main keyword. Write a title using that keyword. This happens before you record because your title shapes your content.
Write a loose script or outline. You don't need a word-for-word script, but know your main points and the order you'll cover them.
Create a rough thumbnail concept. Sketch it on paper or mock it up in Canva. This forces you to think about what image will represent your video.
Recording:
Set up your camera and microphone. Record a test clip and check the audio levels. Your voice should peak around -12dB to -6dB in your recording software. Too quiet and you'll have noise when you boost it later. Too loud and you'll get distortion.
Record your video. If you mess up, pause for two seconds and start that sentence again. The pause makes it easy to find and cut the mistake in editing.
Editing workflow:
Import your footage into DaVinci Resolve. Watch it once without editing. Note the timestamps of good sections and mistakes.
Cut out the mistakes, long pauses, and tangents. Your first draft will be too long. That's fine. Cut more.
Clean up the audio in Fairlight. Apply noise reduction and compression. Listen on headphones to catch issues you'd miss on speakers.
Add a simple intro and outro. A 3-5 second intro card with your channel name and a 10-second outro asking viewers to subscribe. Keep it simple.
Export the video.
Pre-upload preparation:
Finalize your thumbnail in Canva. Check it in ThumbnailCheck.
Write your description. First sentence includes your main keyword and explains what the video covers. Add timestamps for major sections. Include links to tools or resources you mentioned.
List your tags. Main keyword first, then related terms.
Upload and optimize:
Upload your video to YouTube Studio. Add the title, description, tags, and thumbnail.
In the video details, set your video to "unlisted" first if you want to check everything before publishing. Watch the uploaded video all the way through to catch any export errors.
When you're ready, set it to "public" and publish.
Common Mistakes That Waste Time
Downloading too many tools: You don't need 15 different apps. DaVinci Resolve, Audacity, Canva, and TubeBuddy cover 95% of what you need. More tools means more time learning interfaces instead of making videos.
Obsessing over production quality: Your first 10 videos will look rough. That's expected. You improve by making videos, not by researching equipment or watching tutorials. Good enough is good enough when you're starting.
Ignoring audio: Viewers tolerate shaky footage or basic editing. They will not tolerate bad audio. If you invest money in anything, make it a basic USB microphone. But even phone audio works if you record in a quiet room close to the microphone.
Copying trending topics without understanding your niche: Just because a video format is popular doesn't mean it fits your channel. Make content your target audience wants, not what's generically popular.
Not checking analytics: You're guessing without data. Check your YouTube Studio analytics after every video. Look for patterns in what works and what doesn't.
When to Upgrade From Free Tools
Free tools handle everything you need for your first 50-100 videos. You'll know when you've outgrown them because you'll hit specific limitations.
You might need paid tools when:
- You're editing 4K footage and DaVinci Resolve's free version is too slow on your computer (upgrade to DaVinci Resolve Studio or a faster computer)
- You need advanced SEO data beyond what TubeBuddy's free tier provides (upgrade to TubeBuddy Pro)
- You're creating complex thumbnails daily and Canva's free templates feel limiting (upgrade to Canva Pro)
- You need more than 10,000 characters per month of AI voiceover (upgrade ElevenLabs or record your own voice)
But these limitations only matter after you've proven your channel concept works. Spending money before you have an audience is backwards. Build the audience with free tools, then invest profits into upgrades that save time or improve quality in measurable ways.
Building Your Creator Habit
Tools don't make you a successful creator. Consistency does.
Set a realistic publishing schedule. One video per week is manageable for most people with full-time jobs. One video every two weeks works too. The schedule matters less than sticking to it.
Batch your work. Record three videos in one session. Edit them over the next week. This is more efficient than setting up equipment for each individual video.
Track your progress somewhere other than YouTube Studio. A simple spreadsheet with video titles, publish dates, views after 7 days, and CTR gives you a clear picture of growth over time.
The creators who succeed aren't the ones with the best equipment or the most talent. They're the ones who publish consistently, learn from their data, and keep improving. Your free toolkit gives you everything you need to do exactly that.