A Beginner's Guide to Using VR in Video Production
Why VR Is Showing Up on More Production Sets
Not long ago, virtual reality was mostly associated with gaming demos at trade shows and expensive headsets collecting dust in tech labs. That has changed. As virtual reality filmmaking has matured, VR is now appearing in documentary filmmaking, corporate training videos, live event coverage, real estate walkthroughs, and narrative short films. The barrier to entry has dropped considerably, and the tools available to independent producers have become genuinely usable.
If you are new to video production or coming from a traditional filmmaking background, the jump into VR can feel disorienting. The rules you learned about framing, editing, and directing attention do not all carry over. Some of them break entirely. This guide walks through what VR production actually involves, where it differs from conventional video work, and how to get started without wasting time or money on the wrong approach.
Understanding What VR Video Actually Is
Before touching any equipment, it helps to be clear about what you are making. "VR video" covers a few different things that get lumped together.
360-Degree Video
This is the most common format for beginners. A 360-degree camera captures the full sphere around it, and viewers can look in any direction using a headset or by dragging the frame on a phone or computer. The viewer cannot move through the space, only rotate their perspective. Think of it as being placed inside a bubble.
This format is relatively accessible. In the entertainment and media sector, 360° cameras in entertainment and media are used for immersive content creation and live streaming of events, and consumer options like the Insta360 X4 and GoPro MAX bring that capability within reach at a reasonable cost. The editing workflow is more involved than standard video, but not wildly different once you understand the tools.
Six Degrees of Freedom (6DoF) Content
This is more complex. In 6DoF experiences, viewers can physically move through a virtual space, not just look around. This requires either game engine development (using tools like Unreal Engine or Unity) or volumetric video capture, which records subjects from multiple angles simultaneously to create three-dimensional representations. For most beginners, 6DoF production is out of scope until you have solid experience with simpler formats.
Stereoscopic 3D vs. Monoscopic 360
360-degree video can be either monoscopic (flat, like a regular image wrapped around a sphere) or stereoscopic (two slightly offset images that create depth perception). Stereoscopic 360 is more immersive but significantly harder to shoot and stitch correctly. For a first project, monoscopic is the practical choice.
Key Differences From Traditional Video Production
If you have shot conventional video before, some of your instincts will help you. Others will actively work against you.
There Is No Frame
In traditional video, the frame is everything. You compose shots, lead the eye, and control what the viewer sees. In 360-degree VR, the viewer decides where to look. You cannot cut to a close-up to direct attention. You cannot rely on shallow depth of field to isolate a subject. The entire environment is the image.
This is the single biggest mental shift for traditional filmmakers. You are no longer a painter deciding what goes on the canvas. You are an architect designing a room that someone will walk into.
Hiding the Crew Is a Real Problem
In a standard shoot, the crew stands behind the camera. In 360-degree production, there is no "behind the camera." The camera sees everything. Good 360-degree scene planning means accounting for every angle and ensuring nothing unsightly falls within the camera's view, which is why your director, sound operator, lighting rigs, and anyone else on set needs to be hidden, removed in post, or incorporated into the scene. Many productions solve this by having the crew leave the set entirely and triggering the camera remotely.
Cuts Work Differently
Hard cuts in VR can be jarring and disorienting. When you cut in traditional video, the viewer's eyes are already focused on the frame. In VR, a sudden cut can leave the viewer looking in the wrong direction, missing the action entirely. Many VR productions use longer takes, fades to black, or spatial audio cues to guide viewers before a scene change.
Sound Becomes More Important
In traditional video, sound supports the image. In VR, sound often guides where the viewer looks. Spatial audio, which positions sounds in three-dimensional space, is a core tool for directing attention. A voice coming from the left will cause most viewers to turn left. This is one of the primary ways VR directors influence the viewing experience without controlling the frame.
Equipment You Actually Need to Start
You do not need a six-figure budget to make your first VR video. Here is a practical breakdown of what matters.
The Camera
For beginners, a consumer-grade 360-degree camera is the right starting point. The main options in this category capture footage in all directions using two or more wide-angle lenses, then stitch the images together automatically or in post.
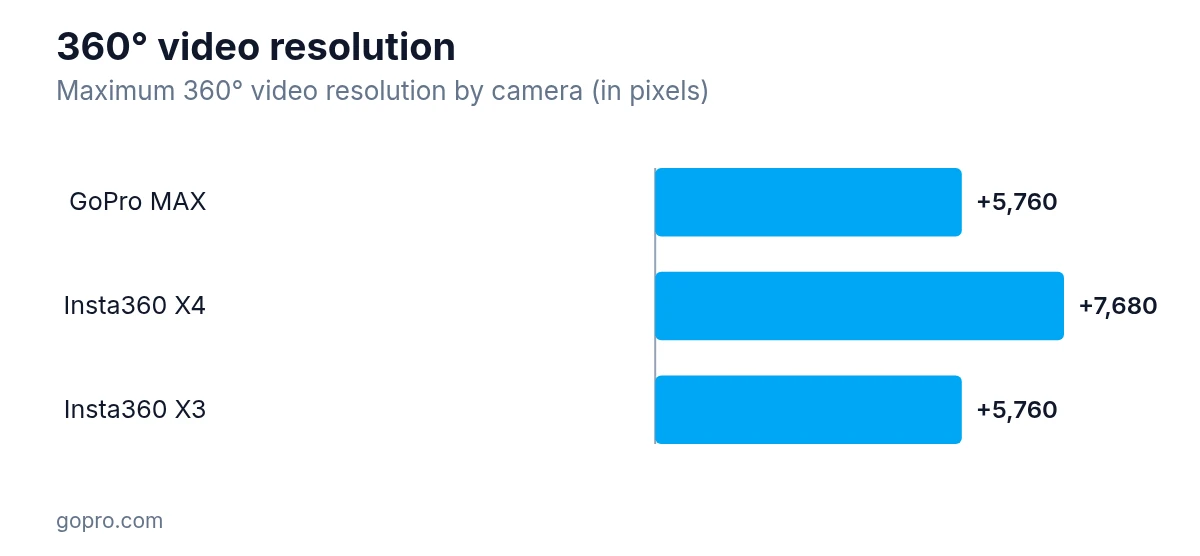
The Insta360 X4 offers the highest resolution at 7,680 pixels, while both the GoPro MAX and Insta360 X3 reach 5,760 pixels—just above the 5.7K starting point.
Key things to look for:
- Resolution of at least 5.7K for watchable VR output, though the 8K 360-degree video quality available on cameras like the Insta360 X4 gives you noticeably better footage to work with
- Good low-light performance, since you cannot always control your environment
- Built-in stitching or a companion app that handles it reliably
- A small physical footprint, since the camera will often be visible in the shot
Support and Stabilization
Handheld 360-degree footage looks terrible. The viewer is inside the image, so any shake is amplified. A sturdy tripod is essential. For moving shots, a gimbal designed for 360 cameras helps, though moving camera work in VR requires careful planning to avoid motion sickness in viewers.
Keep the camera at eye level when possible. Placing it too low or too high creates a distorted sense of scale that feels unnatural.
Audio
Do not neglect audio. A built-in microphone on a 360 camera is rarely sufficient for professional work. A spatial audio microphone, sometimes called an ambisonic microphone, captures sound in a way that can be decoded to match the viewer's head orientation in the headset. The Ambisonic soundfield rotation works by adjusting the entire soundfield based on the listener's orientation, including head rotation in VR, which is what creates the sensation that sounds are coming from specific directions.
The Zoom H3-VR and Sennheiser AMBEO are two commonly used options in this category.
Playback and Review
You need a way to review your footage in VR during or after production. A mid-range VR headset like the Meta Quest series works well for this. Reviewing footage on a flat monitor does not give you an accurate sense of how it will feel in the headset. What looks fine on a screen can feel claustrophobic or disorienting when viewed in 360.
Pre-Production: Planning for a World Without a Frame
Pre-production for VR requires more spatial thinking than traditional video planning.
Storyboarding in 360
Standard storyboards do not work for VR. Some directors use "sphere maps," which are flat representations of the entire 360-degree environment laid out in a rectangular format (called equirectangular projection). Others sketch overhead diagrams showing where subjects, the camera, and points of interest are positioned relative to each other.
The goal is to think about where the viewer's attention is likely to be at any given moment, and where you want it to go. This is not about control, it is about design.
Directing Viewer Attention Without Cutting
Since you cannot cut to what you want the viewer to see, you need other tools:
- Position the most important action in front of the viewer at the start of a scene, so they are already looking in the right direction
- Use sound to draw attention before an event happens
- Use light to make key areas brighter or more visually interesting
- Use movement, since the eye naturally follows motion
- Give viewers a moment to settle before the key action begins
Blocking and Rehearsal
Blocking (positioning actors and elements in the scene) matters enormously in VR because the camera sees everything. Walk through the scene from the camera's position before shooting. Check every direction. Look for things that break the illusion: equipment, crew, cables, reflections in windows.
Rehearse the scene fully before the crew leaves the set, because once they are gone, you are triggering the camera remotely and cannot easily intervene.
Shooting: What Changes on the Day
A few practical habits will save you significant time and frustration on a VR shoot.
Mark the Nadir
The nadir is the bottom of the 360-degree sphere, directly below the camera. This is where the tripod is, and it is usually the hardest area to clean up in post. Some cameras have a nadir patch feature that automatically covers this area with a logo or blurred fill. Others require manual patching in editing. Plan for it from the start.
Use a Remote Trigger
As mentioned, the crew needs to be out of the shot when you roll. Use a Bluetooth remote, a companion app, or a countdown timer to trigger recording. Build a consistent routine: set the shot, clear the set, trigger remotely, wait for the scene to finish, return to check.
Shoot Longer Takes
Because cuts are disorienting in VR and because you cannot direct the viewer's gaze precisely, longer takes give viewers time to explore the environment. A scene that would be 30 seconds in a traditional edit might run 90 seconds in VR to let the viewer look around and absorb the space.
Label Your Stitching Points
Most 360-degree cameras have a visible seam where the two lenses' images meet. This seam is usually on the sides of the camera. If you know where it is, you can position subjects and key action away from it, which reduces stitching artifacts in the final image.
Post-Production: Stitching, Editing, and Delivery
Post-production for VR has some unique steps that do not exist in traditional editing.
Stitching
If your camera does not stitch automatically, you will need to use dedicated software. Most camera manufacturers provide their own stitching apps. Third-party tools like Mistika VR or PTGui offer more control for complex shots. Stitching takes the footage from multiple lenses and blends it into a single equirectangular image.
Check the stitch carefully, especially along the seam lines and in areas with fine detail like hair or foliage. Stitching errors are very visible in a headset.
Editing in 360
Standard editing software like Adobe Premiere Pro and DaVinci Resolve support 360-degree video editing with VR-specific plugins or built-in tools. You can make cuts, add titles, and color grade your footage, but you need to work in equirectangular mode and preview in a VR viewer to catch problems.
Avoid placing text or graphics near the poles (top and bottom) of the sphere, where distortion is highest. Position titles and graphics in the front-center of the frame where they will be most readable.
Spatial Audio Mixing
If you recorded ambisonic audio, your editing software or a dedicated tool like Facebook's Spatial Workstation (now part of the Meta Audio SDK) can decode and mix it. The goal is to ensure that sounds match their visual sources as the viewer rotates their head. Test this in a headset, not on speakers.
A practical comparison shows how spatial audio keeps a speaker anchored to the scene.
Delivery Formats
The most common delivery format for consumer VR video is MP4 with H.264 or H.265 encoding, with metadata embedded to tell platforms (YouTube, Facebook, Vimeo) that the file is 360-degree content. Each platform has specific requirements for resolution, bitrate, and metadata injection. The Insta360 and GoPro apps typically handle metadata automatically, but double-check before uploading.
For headset-native delivery (directly on a Meta Quest or similar device), you may need to use a specific player app or the headset's built-in gallery.
Common Mistakes Beginners Make
A few patterns come up repeatedly in first VR projects.
Shooting in low resolution is the most common. Footage that looks sharp on a phone screen looks blurry in a headset because the image is stretched across your entire field of view. Always shoot at the highest resolution your camera supports.
Ignoring the nadir creates a messy-looking bottom of the frame that breaks immersion. Plan for it in pre-production.
Cutting too frequently makes viewers feel disoriented or even nauseous. Give each scene room to breathe.
Forgetting that the viewer might be looking the wrong way during a key moment is a planning failure. Use audio cues, light, and positioning to guide attention before the important action starts.
Reviewing only on a flat screen means you will miss problems that are obvious in a headset. Always do a full headset review before considering a project finished.
Where to Take Your First Project
The best first VR project is something with a controlled environment, a clear subject, and minimal crew requirements. A single-person interview in a visually interesting space works well. A behind-the-scenes look at a craft or process is another good option. These formats let you focus on learning the technical workflow without the added complexity of multiple actors, fast-moving action, or large crews.
Once you have one complete project through the full pipeline, from pre-production planning to headset delivery, the second project will feel significantly more manageable. The learning curve in VR production is steep at first and then levels off quickly once the core concepts click.
The technology will keep changing. Camera quality improves every year and editing tools continue to get better. VR headset use in 2024 actually fell 8% to 21.9 million active devices, so the audience is smaller than the hype suggests, but getting comfortable with the fundamentals now means you will be well-positioned to work with whatever comes next.