How to Use YouTube for Streaming: A Complete Beginner's Guide
You have recorded videos for months. You have edited, uploaded, and waited for views. Now you want to try something different: talking to your audience in real time. Live streaming on YouTube lets you interact with viewers as they watch, answer questions on the spot, and build a more direct connection with your community.
But the first time you click "Go Live," the options can feel overwhelming. Desktop streaming, mobile streaming, encoder streaming. Stream keys, bitrates, verification delays. This guide walks you through every step, from verifying your channel to choosing equipment to hitting that live button for the first time.
What You Need Before You Start
YouTube does not let everyone stream immediately. Your channel must meet specific requirements, and you will need to wait through a verification period.
Channel Verification
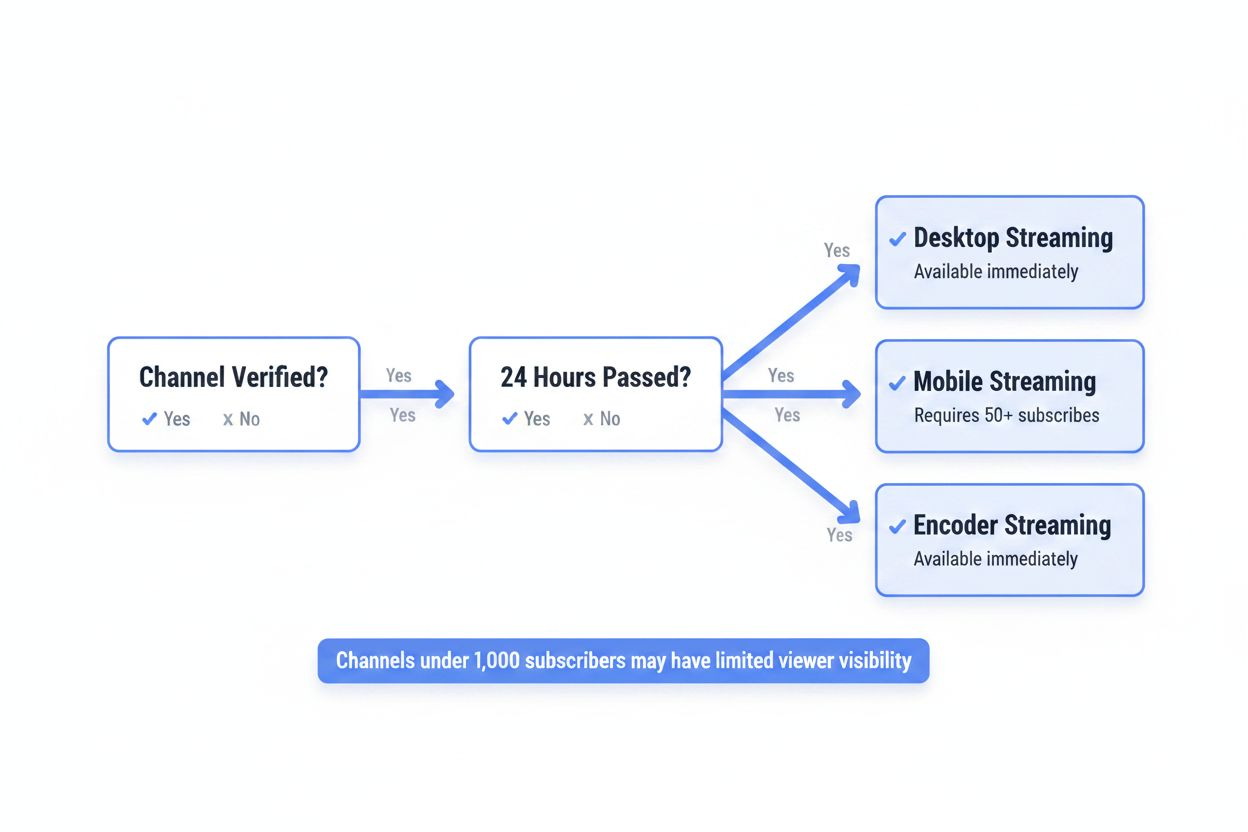
According to Streamlabs, channel verification is a one-click action but can take up to 24 hours to process. You verify your channel by providing a phone number. YouTube sends a code via text or automated call, you enter it, and your channel gains access to features like custom thumbnails, videos longer than 15 minutes, and live streaming.
Primal Video notes that first-time streamers must wait 24 hours after account verification before going live. This delay applies to everyone. If you verify your channel today, you can stream tomorrow.
Desktop streaming becomes available immediately after the 24-hour waiting period. Mobile streaming has an additional barrier.
The 50-Subscriber Requirement for Mobile
According to Onewrk, mobile streaming requires at least 50 subscribers. If your channel has fewer than 50 subscribers, you can still stream from a computer using YouTube Studio or streaming software like OBS. You just cannot go live directly from the YouTube mobile app.
Primal Video mentions that apps like Prism Live Studio can be used to bypass the 50-subscriber minimum. These third-party apps connect to YouTube's streaming infrastructure but do not enforce the same subscriber threshold as the official YouTube app.
Viewer Visibility Limits
Primal Video also points out that YouTube may limit viewers until a channel hits 1,000 subscribers for safety reasons. Your stream will still go live, but YouTube might not recommend it broadly or surface it in search results as aggressively as streams from established channels. This is not a hard block. Viewers can still find your stream if they search for it or visit your channel directly.
Internet Speed
Onewrk states that a minimum upload speed of 1 Mbps is required, with 5 Mbps recommended for 1080p streaming. Upload speed is not the same as download speed. Most home internet plans advertise download speeds (the speed at which you load web pages or stream Netflix). Upload speed is usually much lower.
Run a speed test at fast.com or speedtest.net. Look at the upload number. If it is below 1 Mbps, streaming will be choppy or impossible. If it is between 1 and 5 Mbps, you can stream at 720p. If it is 5 Mbps or higher, 1080p is feasible.
Wired connections (Ethernet) are more stable than Wi-Fi. If your upload speed is borderline, plug your computer directly into your router.
Equipment: What You Actually Need
You do not need a studio. You do not need a $2,000 camera. You need a device that can capture video and audio, and an internet connection that can send that data to YouTube without dropping frames.
Bare Minimum Setup
For desktop streaming, you need a computer with a webcam and microphone. Most laptops have both built in. If you are using a desktop, a $30 USB webcam and a $20 USB microphone will work.
For mobile streaming, you need a smartphone. The camera and microphone are already there.
That is it. You can go live right now with what you already own.
Upgrades That Matter
If you want better quality, prioritize in this order:
Microphone. Audio quality matters more than video quality. A $50 USB microphone (like the Samson Q2U or Fifine K669) will sound dramatically better than your laptop's built-in mic.
Lighting. A $25 ring light or a desk lamp pointed at a white wall behind your monitor will eliminate shadows and make your webcam look sharper.
Camera. If you already have a DSLR or mirrorless camera, you can use it as a webcam with a capture card or software like OBS. But do not buy a camera just for streaming unless your built-in webcam is genuinely broken.
Streaming software. OBS Studio and Streamlabs Desktop are both free. They let you add overlays, switch between scenes, and control your stream layout. You do not need them to go live, but they give you more control than YouTube Studio's basic interface.
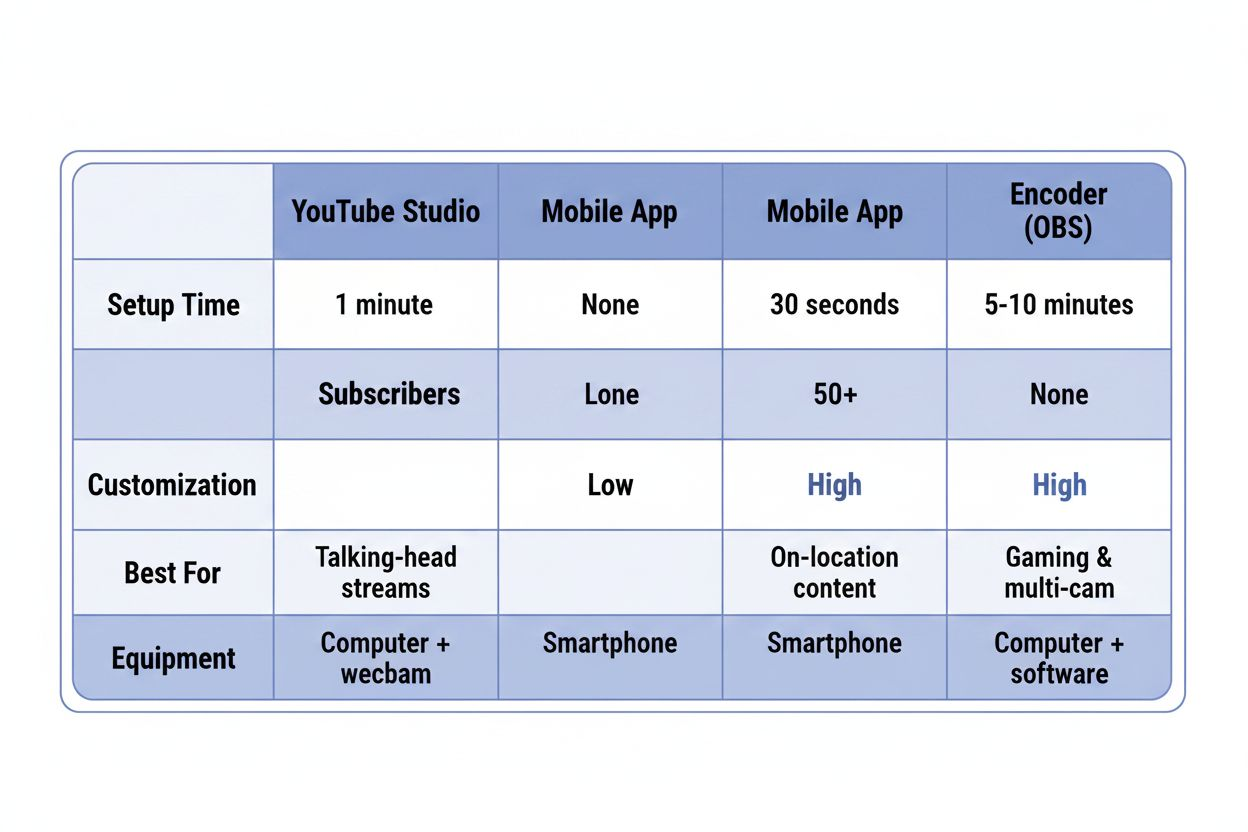
Three Ways to Stream on YouTube
YouTube offers three streaming methods. Each has different use cases.
Method 1: YouTube Studio (Desktop, No Software Required)
This is the simplest option. You log into YouTube Studio, click "Create" in the top right, select "Go Live," and YouTube opens a browser-based streaming interface. You choose your webcam and microphone from dropdown menus, set your stream title and privacy settings, and click "Go Live."
This method works for talking-head streams, Q&A sessions, or simple presentations. You cannot add overlays, switch cameras, or display your screen and your face at the same time. It is one input: your webcam.
Method 2: Mobile Streaming (YouTube App)
If you have 50 or more subscribers, you can stream directly from the YouTube app. Open the app, tap the "+" icon, select "Go Live," and the app will ask for camera and microphone permissions. You can flip between front and rear cameras, add a title, and go live in under a minute.
Mobile streaming is good for on-location content: walking through a convention, showing a workspace, streaming from a park. The quality depends on your phone's camera and your cellular or Wi-Fi connection. If your upload speed drops, YouTube will automatically lower your stream quality to prevent buffering.
Method 3: Encoder Streaming (OBS, Streamlabs, or Other Software)
Encoder streaming means you use software on your computer to send video to YouTube. The software (called an encoder) captures your webcam, microphone, screen, or any combination of inputs, processes them, and sends the stream to YouTube's servers.
Streamlabs notes that Streamlabs Desktop integrates directly with YouTube, with no stream key or URL entry required. You log into your YouTube account from within Streamlabs, and the software handles the connection. Creators can set stream title, description, and category directly from within Streamlabs.
OBS Studio works the same way but requires you to copy your stream key from YouTube Studio and paste it into OBS settings. Once connected, OBS sends your stream to YouTube.
Encoder streaming is the most flexible option. You can display your gameplay, your webcam, your screen, and text overlays all at once. You can switch between scenes (like cutting from your face to a full-screen presentation). You can add background music, sound effects, or pre-recorded video clips.
Step-by-Step: Streaming from YouTube Studio
This is the fastest way to go live from a computer.
- Go to studio.youtube.com and log into your channel.
- Click "Create" in the top right corner.
- Select "Go Live."
- If this is your first time, YouTube will ask you to verify your channel. Follow the phone verification steps. Wait 24 hours.
- After the waiting period, return to YouTube Studio and click "Create" > "Go Live" again.
- YouTube will ask for camera and microphone permissions. Grant them.
- You will see a preview of your webcam feed. Below it, enter your stream title, description, and choose a category (Gaming, Education, Music, etc.).
- Set your privacy: Public (anyone can watch), Unlisted (only people with the link can watch), or Private (only you can watch, useful for testing).
- Click "Go Live." YouTube will take 5-10 seconds to start the stream.
- You are live. The chat window appears on the right. Viewers can comment in real time.
- When you are done, click "End Stream." YouTube will process the stream and save it as a video on your channel (unless you delete it).
This method has no settings to configure. YouTube automatically adjusts your bitrate and resolution based on your internet speed.
Step-by-Step: Streaming from the YouTube Mobile App
If you have 50 or more subscribers, you can stream from your phone.
- Open the YouTube app on your phone.
- Tap the "+" icon at the bottom center of the screen.
- Select "Go Live."
- Grant camera and microphone permissions if prompted.
- Add a title for your stream. You can also add a description, but it is optional.
- Choose your privacy setting (Public, Unlisted, or Private).
- Tap "Go Live." The app will count down from 3.
- You are live. Viewers can comment, and you will see the chat overlaid on your screen (you can minimize it by tapping the chat icon).
- Tap "Finish" when you are done. The stream ends and saves to your channel.
You can flip between front and rear cameras during the stream by tapping the camera icon. You can also enable or disable comments by tapping the three-dot menu.
Step-by-Step: Streaming with OBS Studio
OBS Studio is free, open-source software. It runs on Windows, Mac, and Linux. This walkthrough assumes you have already downloaded and installed OBS from obsproject.com.
Connecting OBS to YouTube
- Open OBS Studio.
- In the bottom right, click "Settings."
- Click "Stream" in the left sidebar.
- Under "Service," select "YouTube - RTMPS."
- Open a browser and go to studio.youtube.com.
- Click "Create" > "Go Live."
- Instead of using the webcam interface, click "Stream" at the top (next to "Webcam").
- YouTube will display your "Stream Key." Copy it.
- Return to OBS. Paste the stream key into the "Stream Key" field.
- Click "OK" to close settings.
OBS is now connected to your YouTube channel. Anything you add to your OBS scene will appear on your stream.
Setting Up Your First Scene
OBS works with scenes and sources. A scene is a layout (like "Webcam Only" or "Gameplay + Webcam"). A source is an input (your webcam, your microphone, your screen, an image, etc.).
- In the "Scenes" box (bottom left), click the "+" icon to add a new scene. Name it "Webcam."
- In the "Sources" box (below Scenes), click the "+" icon.
- Select "Video Capture Device." Click "OK."
- Under "Device," choose your webcam from the dropdown. Click "OK."
- Your webcam feed appears in the OBS preview window. You can resize it by dragging the red corners.
- Click the "+" icon in Sources again. Select "Audio Input Capture." Click "OK."
- Under "Device," choose your microphone. Click "OK."
You now have a scene with your webcam and microphone. You can add more sources (like images, text, or browser windows) by clicking the "+" icon in Sources.
Going Live
- In YouTube Studio, set your stream title, description, and privacy settings (these are on the same page where you copied your stream key).
- Return to OBS. Click "Start Streaming" in the bottom right.
- OBS sends your video to YouTube. Go back to YouTube Studio. You will see your stream preview appear.
- Click "Go Live" in YouTube Studio.
- You are live.
- When you are done, click "End Stream" in YouTube Studio. Then click "Stop Streaming" in OBS.
Step-by-Step: Streaming with Streamlabs Desktop
Streamlabs Desktop is a modified version of OBS with built-in themes, overlays, and alerts. It is free, but some features require a paid subscription. Download it from streamlabs.com.
Connecting Streamlabs to YouTube
Streamlabs notes that Streamlabs Desktop integrates directly with YouTube, with no stream key or URL entry required.
- Open Streamlabs Desktop.
- If this is your first time, Streamlabs will ask you to log in. Click "YouTube" and log into your Google account.
- Grant Streamlabs permission to access your YouTube channel.
- Streamlabs is now connected. You do not need to copy a stream key.
Setting Up Your First Scene
Streamlabs uses the same scene and source structure as OBS.
- In the "Scenes" panel (left side), click the "+" icon. Name your scene "Webcam."
- In the "Sources" panel (below Scenes), click the "+" icon.
- Select "Video Capture Device." Choose your webcam from the dropdown. Click "Done."
- Click the "+" icon in Sources again. Select "Audio Input Capture." Choose your microphone. Click "Done."
Your webcam and microphone are now active.
Going Live
- In the top right of Streamlabs, click "Go Live."
- A window appears. Enter your stream title, description, and category. These fields sync directly with YouTube.
- Click "Confirm & Go Live."
- Streamlabs starts streaming. You are live on YouTube.
- When you are done, click "End Stream" in the top right.
Streamlabs simplifies the process by letting you set stream details from within the software. You do not need to switch between Streamlabs and YouTube Studio.
Common Problems and How to Fix Them
"I verified my channel, but I still can't go live."
Wait 24 hours. Primal Video confirms that first-time streamers must wait 24 hours after account verification before going live. The timer starts when you complete phone verification, not when you click "Go Live."
"My stream is laggy or keeps buffering."
Your upload speed is too low, or your bitrate is too high. Check your upload speed at fast.com. If it is below 5 Mbps, lower your stream resolution to 720p. In OBS or Streamlabs, go to Settings > Output > Streaming. Set "Video Bitrate" to 2500 Kbps for 720p or 4500 Kbps for 1080p. Onewrk recommends 5 Mbps upload speed for 1080p streaming.
"I can't stream from my phone."
You need 50 subscribers. Onewrk states that mobile streaming requires at least 50 subscribers. If you have fewer, stream from a computer using YouTube Studio or OBS. Alternatively, Primal Video mentions that apps like Prism Live Studio can bypass the 50-subscriber minimum.
"My audio is echoing."
You are hearing your own voice through your speakers, and your microphone is picking it up again. Wear headphones. This breaks the feedback loop.
"No one is watching my stream."
Primal Video notes that YouTube may limit viewers until a channel hits 1,000 subscribers for safety reasons. Your stream is live, but YouTube is not promoting it. Share the link on social media, in your community tab, or in relevant forums. Viewers will not find your stream unless you tell them about it.
"OBS says 'Failed to connect to server.'"
Your stream key is wrong, or you copied it incorrectly. Go back to YouTube Studio, copy the stream key again, and paste it into OBS Settings > Stream > Stream Key. Make sure there are no extra spaces before or after the key.
What to Do During Your First Stream
Your first stream will feel awkward. You will talk to an empty chat. You will forget what you planned to say. You will wonder if anyone is watching. This is normal.
Talk as if someone is there. Even if the viewer count says zero, someone might join in the middle. If you are silent, they will leave. Narrate what you are doing. Explain your setup. Answer imaginary questions.
Acknowledge new viewers by name. When someone joins the chat, say hello. "Hey, thanks for joining, [username]." This makes them feel seen and more likely to stay.
Have a topic or activity. Do not just sit there. Play a game, answer questions, demonstrate a skill, review a product, or walk through a tutorial. Give viewers a reason to watch.
Keep it short. Your first stream does not need to be two hours long. 20 to 30 minutes is fine. You can always extend future streams once you are comfortable.
Save the stream. After you end the stream, YouTube saves it as a regular video on your channel. You can edit the title, add a thumbnail, and promote it later. Some of your best content might come from unscripted live moments.
Why YouTube for Streaming?
Onewrk reports that YouTube has over 2 billion logged-in monthly users on its live streaming platform. That is a massive potential audience. Unlike Twitch, where discoverability depends on being in the right category at the right time, YouTube streams can be found through search. If someone searches for "how to fix a leaky faucet" and you are streaming a plumbing tutorial, they might land on your live stream instead of a pre-recorded video.
YouTube also saves your streams automatically. On Twitch, streams disappear after 14 days unless you manually export them. On YouTube, every stream becomes a permanent video on your channel. You can edit the title, add a thumbnail, and let it accumulate views long after the stream ends.
If you already have a YouTube channel, streaming lets you engage your existing audience in a new way. Subscribers get notified when you go live. They can ask questions, make requests, and interact with you in real time. This builds loyalty faster than uploading videos and waiting for comments.
What Happens After You Click "End Stream"
YouTube processes your stream and saves it as a video. Processing takes a few minutes to an hour, depending on stream length. Once processing finishes, the video appears on your channel like any other upload.
You can edit the title, description, and thumbnail. You can trim the beginning or end if you left the stream running too long. You can add the video to playlists, pin comments, or delete it entirely if you are not happy with how it turned out.
YouTube also generates analytics. You can see how many people watched, how long they stayed, where they came from, and which moments had the most viewers. This data helps you figure out what worked and what to change for your next stream.
Your First Stream Will Not Be Perfect
You will forget to unmute your microphone. You will accidentally end the stream too early. You will say "um" 47 times in 10 minutes. You will look at the wrong camera. You will realize halfway through that your lighting makes you look like a ghost.
None of this matters. The only way to get better at streaming is to stream. Your tenth stream will be smoother than your first. Your fiftieth stream will feel natural. But you cannot get to stream 50 without starting at stream one.
Verify your channel. Wait 24 hours. Pick a method (YouTube Studio, mobile, or OBS). Set up your webcam and microphone. Click "Go Live." Talk for 20 minutes. End the stream. You just became a live streamer.