Top Techniques to Enhance Video Quality in Post-Production

Why Post-Production Is Where Good Footage Becomes Great Video
Shooting clean footage is only half the job. The real difference between amateur video and professional output often comes down to what happens after the camera stops rolling. Post-production is where color, clarity, sound, and pacing all get shaped into something that holds an audience's attention.
The good news is that modern software has made many of these techniques accessible to editors at every level. The challenge is knowing which tools to apply, in what order, and how much is too much. Over-processing is one of the most common mistakes in post-production, and it tends to be more damaging than under-processing.
This guide covers the core techniques that consistently produce better results, from color correction to noise reduction, sharpening, audio cleanup, and export settings. Each section focuses on practical application rather than theory.
Color Correction: The Foundation You Cannot Skip
Color correction and color grading are two different things, and mixing them up causes problems. Color correction comes first. Its purpose is to make the footage look accurate, not stylized. You are fixing white balance, exposure, and contrast so that the image represents what was actually in front of the camera.
Start with Scopes, Not Your Eyes
Your monitor can lie to you. Display brightness, room lighting, and even screen calibration all affect how you perceive color. Waveform monitors, vectorscopes, and histograms give you objective measurements.
The waveform shows luminance distribution. A properly exposed image typically has detail across the full range without clipping at the top (pure white, no detail) or crushing at the bottom (pure black, no shadow detail). Before touching anything else, check your waveform and bring the image into a workable range.
The vectorscope shows color saturation and hue. Skin tones should fall along a specific diagonal line on the vectorscope, regardless of the subject's skin color. If they do not, your white balance is off.
White Balance Correction
If the footage was shot with an incorrect white balance, you will see a color cast across the entire image. Indoor footage shot under tungsten light without correction looks orange. Footage shot in shade without adjustment looks blue.
Most editing applications let you use a color picker to sample a neutral area in the frame (something that should be white or gray) and automatically correct the white balance from there. If no neutral reference exists in the shot, you will need to adjust the color temperature and tint sliders manually while watching your vectorscope.
Exposure and Contrast
After white balance, address exposure. Lift your shadows if they are crushed, bring down highlights if they are clipped. The goal at this stage is to recover as much detail as possible, not to create a look.
Contrast is adjusted after exposure. Adding contrast compresses the midtones and separates the shadows from the highlights. Be careful not to clip either end while doing this.
Color Grading: Creating a Look That Serves the Story
Once the footage is corrected and looks neutral, grading adds the visual style. This is where you make creative decisions about mood, tone, and feel.
Primary and Secondary Corrections
Primary corrections affect the entire image. You are adjusting the shadows, midtones, and highlights globally using tools like the three-way color wheel or curves.
Secondary corrections target specific parts of the image. You might pull the sky bluer without affecting the skin tones, or warm up a person's face without changing the background. This is done using qualifiers (selecting a specific color range or luminance range) or masks.
Using LUTs Intelligently
LUTs (Look-Up Tables) are preset color transformations that can dramatically change the look of footage in one click. They are useful, but they are not a substitute for proper correction.
Apply a LUT after your base correction, not before. A LUT applied to poorly exposed or incorrectly white-balanced footage will look wrong because it was designed for footage that is already in a neutral, corrected state. Many LUTs are also designed for specific camera profiles, and LUT compatibility across log curves is not interchangeable: a LUT built for LogC3 is wrong on LogC4 footage, even from the same camera family.
Reduce the LUT intensity when it feels too heavy. Most applications let you dial back the LUT's influence to blend it with the underlying image.
Sharpening and Detail Enhancement
Sharpening is one of the most misunderstood tools in post-production. Applied correctly, it makes footage look crisp and detailed. Applied too aggressively, it creates harsh edges, halos, and an artificial, over-processed look.
How Sharpening Actually Works
Most sharpening algorithms work by increasing contrast along edges in the image. The software detects where light meets dark and makes that transition more abrupt. This creates the perception of greater detail.
The key parameters to understand are:
- Amount: How strong the sharpening effect is
- Radius: How many pixels around each edge are affected
- Threshold: How different two adjacent pixels need to be before sharpening is applied
A high radius creates obvious halos around edges. A low threshold sharpens everything, including noise. For video, keep the radius small (1-2 pixels) and set the threshold high enough to avoid sharpening noise in flat areas like skies or skin.
Sharpening for Different Types of Footage
Footage shot at a lower resolution and upscaled benefits from sharpening more than native high-resolution footage. Slow-motion footage often looks slightly soft due to the way high frame rate sensors capture light, and a modest sharpening pass helps.
Portrait footage requires careful sharpening. You want to sharpen the eyes and hair but avoid sharpening skin texture, which can make it look rough or unflattering. Some editors use masking to apply sharpening only to specific areas.
Unsharp Mask vs. High-Pass Sharpening
Unsharp mask is the standard sharpening tool in most applications. High-pass sharpening is a technique that gives you more control. It involves duplicating the layer, applying a high-pass filter, and blending it over the original using a contrast blend mode. This method tends to produce more natural-looking results with less risk of halos.
Noise Reduction
Camera noise (the grain-like texture that appears in low-light footage) can be distracting and make video look cheap. Noise reduction software has improved significantly, and the best tools today can clean up footage that would have been unusable a few years ago.
Temporal vs. Spatial Noise Reduction
Spatial noise reduction analyzes each frame individually and smooths out random pixel variation. It works well but can make footage look waxy or plastic if pushed too far.
Temporal noise reduction analyzes multiple frames together and uses temporal redundancy in denoising to separate signal from grain: even when individual frames are severely degraded, the consistency of real detail across frames gives the denoiser statistically richer information about true scene structure. It generally produces cleaner results but requires more processing power and can create artifacts in footage with fast motion.
Most professional applications offer both, and combining them at moderate settings often gives better results than using either one at high settings.
Preserving Texture While Reducing Noise
The biggest risk with noise reduction is removing too much. Skin, fabric, and natural textures all have fine detail that can be mistaken for noise. If you reduce noise aggressively, faces start to look like plastic and backgrounds lose their sense of depth.
Work in passes. Apply a small amount of noise reduction, check the result at full resolution, and only increase it if necessary. Always compare with the original at 100% zoom before committing.
Some editors deliberately leave a small amount of noise in the image, or even add film grain afterward, because a completely noise-free image can look sterile and unnatural.
Audio Cleanup and Enhancement
Video quality is not just visual. Poor audio makes even beautiful footage unwatchable, and good audio can make modest visuals feel polished and professional.
Removing Background Noise
Location sound almost always contains some unwanted noise: air conditioning hum, traffic, wind, room tone. Noise reduction plugins work by sampling a section of audio that contains only the noise (no dialogue or music) and then subtracting that noise profile from the rest of the track.
The key is to find a clean noise sample. A second or two of room tone between sentences usually works. Apply the noise reduction conservatively. Aggressive noise reduction creates a hollow, underwater sound that is often more distracting than the original noise.
Equalization for Dialogue
Dialogue should be clear and centered in the frequency range. A few EQ adjustments make a consistent difference:
- Roll off everything below 80-100 Hz to remove low-frequency rumble and handling noise
- Reduce a narrow band around 200-300 Hz if the voice sounds muddy or boxy
- Add a small boost around 3-5 kHz to improve clarity and intelligibility
- Roll off the very high frequencies if there is excessive sibilance or harshness
These are starting points, not rules. Every recording environment and every voice is different.
Compression for Consistent Levels
Audio compression reduces the dynamic range of a track, making quiet parts louder and loud parts quieter. For dialogue, this means the audience does not have to constantly adjust their volume to follow the conversation.
A moderate compression ratio (around 3:1 to 4:1) with a medium attack and release time works well for most dialogue. Avoid over-compressing, which removes all dynamics and makes voices sound flat and lifeless.
Stabilization
Shaky footage is one of the most common problems in video production, especially for run-and-gun shooting or handheld work. Post-production stabilization can fix a lot, but it has limits.
Software Stabilization
Most editing applications include some form of automatic stabilization. These tools analyze the motion in the footage and apply counter-movement to smooth it out. The better implementations use optical flow analysis to track actual motion in the scene rather than just the overall frame movement.
The trade-off is cropping. Stabilization requires room to move the frame, so the edges of the image get cropped. The more stabilization applied, the more the image gets cropped. For very shaky footage, you can lose a significant portion of the frame.
Shoot with this in mind. If you know footage will need stabilization, frame wider than you need so the crop does not cut into important elements.
When Stabilization Fails
Stabilization works well for smooth, continuous camera movement. It struggles with sudden jerks, rotation, and footage where the camera is moving in multiple directions simultaneously. In these cases, the stabilized result often looks warped or floaty, which can be worse than the original shake.
For extreme cases, dedicated stabilization software (separate from general editing applications) uses more sophisticated algorithms and gives better results. Some tools use machine learning to predict and compensate for motion in ways that standard stabilization cannot.
Upscaling and Resolution Enhancement
Not all footage is shot at the highest resolution available. Older archives, footage from lower-spec cameras, or content originally shot for smaller screens sometimes needs to be upscaled for modern delivery.
Traditional upscaling simply stretches the image and fills in new pixels by averaging surrounding ones. The result is soft and blurry.
AI-based upscaling tools work differently. They use neural networks trained on large datasets to predict what additional detail would look like at a higher resolution. Results from upscaling low-resolution analog footage show the gap clearly: 480p material brought to 1440p, and 320x240 clips from 1995 taken to 1280x960, with noticeably improved crispness, though AI artifacts remain a real risk.
These tools are computationally intensive and slow, but for archival footage or projects where quality matters more than speed, they are worth the processing time.
Export Settings and Delivery
All the work done in post-production can be undermined by poor export settings. Compression artifacts, incorrect color space, and wrong frame rates all degrade the final product.
Codec and Bitrate
The codec determines how the video is compressed for delivery. For online platforms, H.264 and H.265 (HEVC) are the standard choices. H.265 produces smaller files at the same quality, but requires more processing power to encode and decode.
Bitrate determines how much data is used per second of video. Higher bitrate means better quality but larger files. Keep in mind that platforms re-encode your upload: YouTube 1080p output bitrate lands around 5.8 Mbps regardless of what you send in, so uploading at a higher source bitrate gives the platform's encoder more to work with. For 1080p delivery, a source bitrate of 10-20 Mbps in H.264 is generally sufficient for most content. For 4K, a 4K target bitrate in the 45-65 Mbps range works well for a typical 30fps project.
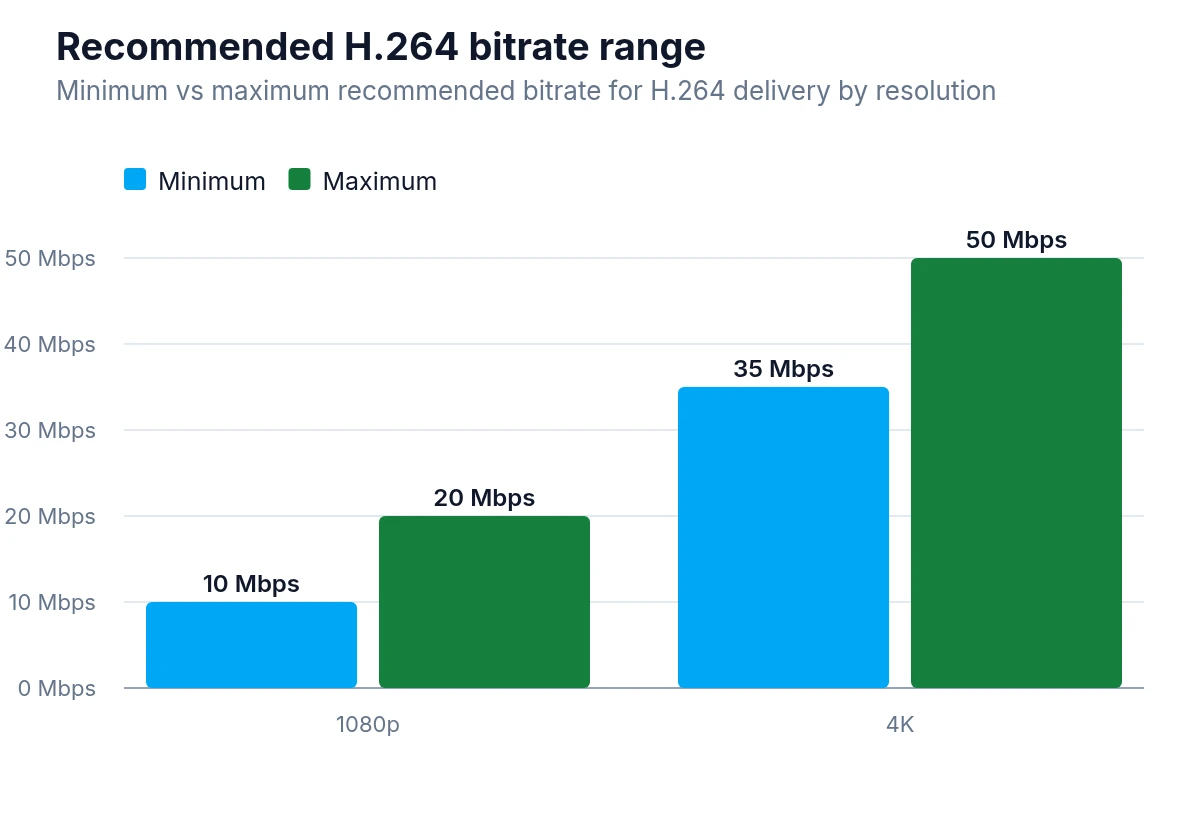
For H.264 delivery, 1080p generally needs about 10 to 20 Mbps, while 4K needs about 35 to 50 Mbps.
Variable bitrate (VBR) encoding allocates more data to complex scenes and less to simple ones. This is more efficient than constant bitrate (CBR) and usually produces better results at the same file size.
Color Space and HDR
Delivering in the wrong color space is a common mistake. Most online platforms expect footage in the Rec. 709 color space. If you have been working in a wider color space (like DCI-P3 or Rec. 2020), make sure your export converts correctly to Rec. 709 for standard delivery.
If delivering HDR content, confirm the platform's specific requirements. HDR standards (HDR10, Dolby Vision, HLG) have different metadata requirements, and submitting the wrong format results in the HDR content displaying incorrectly.
Audio Export
Export audio at 48 kHz sample rate for video delivery. This is the broadcast standard and what most platforms expect. For stereo delivery, ensure your mix is properly balanced and that peak levels do not exceed -1 dBFS to avoid clipping during platform re-encoding.
Building a Consistent Post-Production Workflow
Applying these techniques randomly produces inconsistent results. A structured workflow ensures that every project gets the same level of attention and that steps are not skipped under deadline pressure.
A practical order of operations:
- Organize and review all footage before editing
- Edit the rough cut first, before any color or audio work
- Apply audio cleanup and sync any external audio
- Perform color correction on all clips to create a neutral baseline
- Apply noise reduction where needed
- Apply sharpening and stabilization
- Apply color grading to create the final look
- Mix and master audio
- Review the full cut at the intended delivery resolution
- Export with correct settings for each delivery platform
Doing color grading before a rough cut is locked wastes time. Doing noise reduction before color correction can affect how the correction looks. Order matters.
The other consistent mistake is skipping the review step. Always watch the full project at the intended delivery resolution before exporting. Problems that are invisible at a small preview size become obvious at full resolution.
Making Every Frame Count
Post-production is not about fixing bad footage. The best results come from footage that was shot well and then refined in post. But even well-shot footage benefits from careful color work, clean audio, and thoughtful sharpening.
The techniques covered here are not complicated, but they require patience and attention to detail. The difference between a video that looks professional and one that does not is usually not one big thing. It is a collection of small decisions made correctly at each stage of the process.
Start with the fundamentals: correct color, clean audio, and proper export settings. Once those are solid, the more advanced techniques like secondary color grading, AI upscaling, and targeted noise reduction give you additional tools to push the quality further. Build the workflow, trust the process, and the results will follow.